Architecture photos often go wrong in one of two ways: the grandeur you felt in person shrinks into something flat, or too many elements crowd into one frame and the picture feels stuffy. The same building can look completely different depending on the angle of view, the orientation of the frame, and the exposure. Interiors are especially tricky, because they can be hundreds of times darker than the outside, yet a tripod is often not allowed. It helps to get a feel in advance for how to split the exposure.
This article uses 6 photos and their shooting data (EXIF) from a large wooden building near Pattaya, Thailand, taken on November 3, 2024, to go through angle of view, framing, and exposure for architecture. Construction began in 1981, the tallest spire reaches 105 m, and on the day I visited, scaffolding was still visible on one side. All six photos were taken handheld, with a single body and lens: a Canon EOS R7 and an RF15-35mm F2.8 L IS USM.
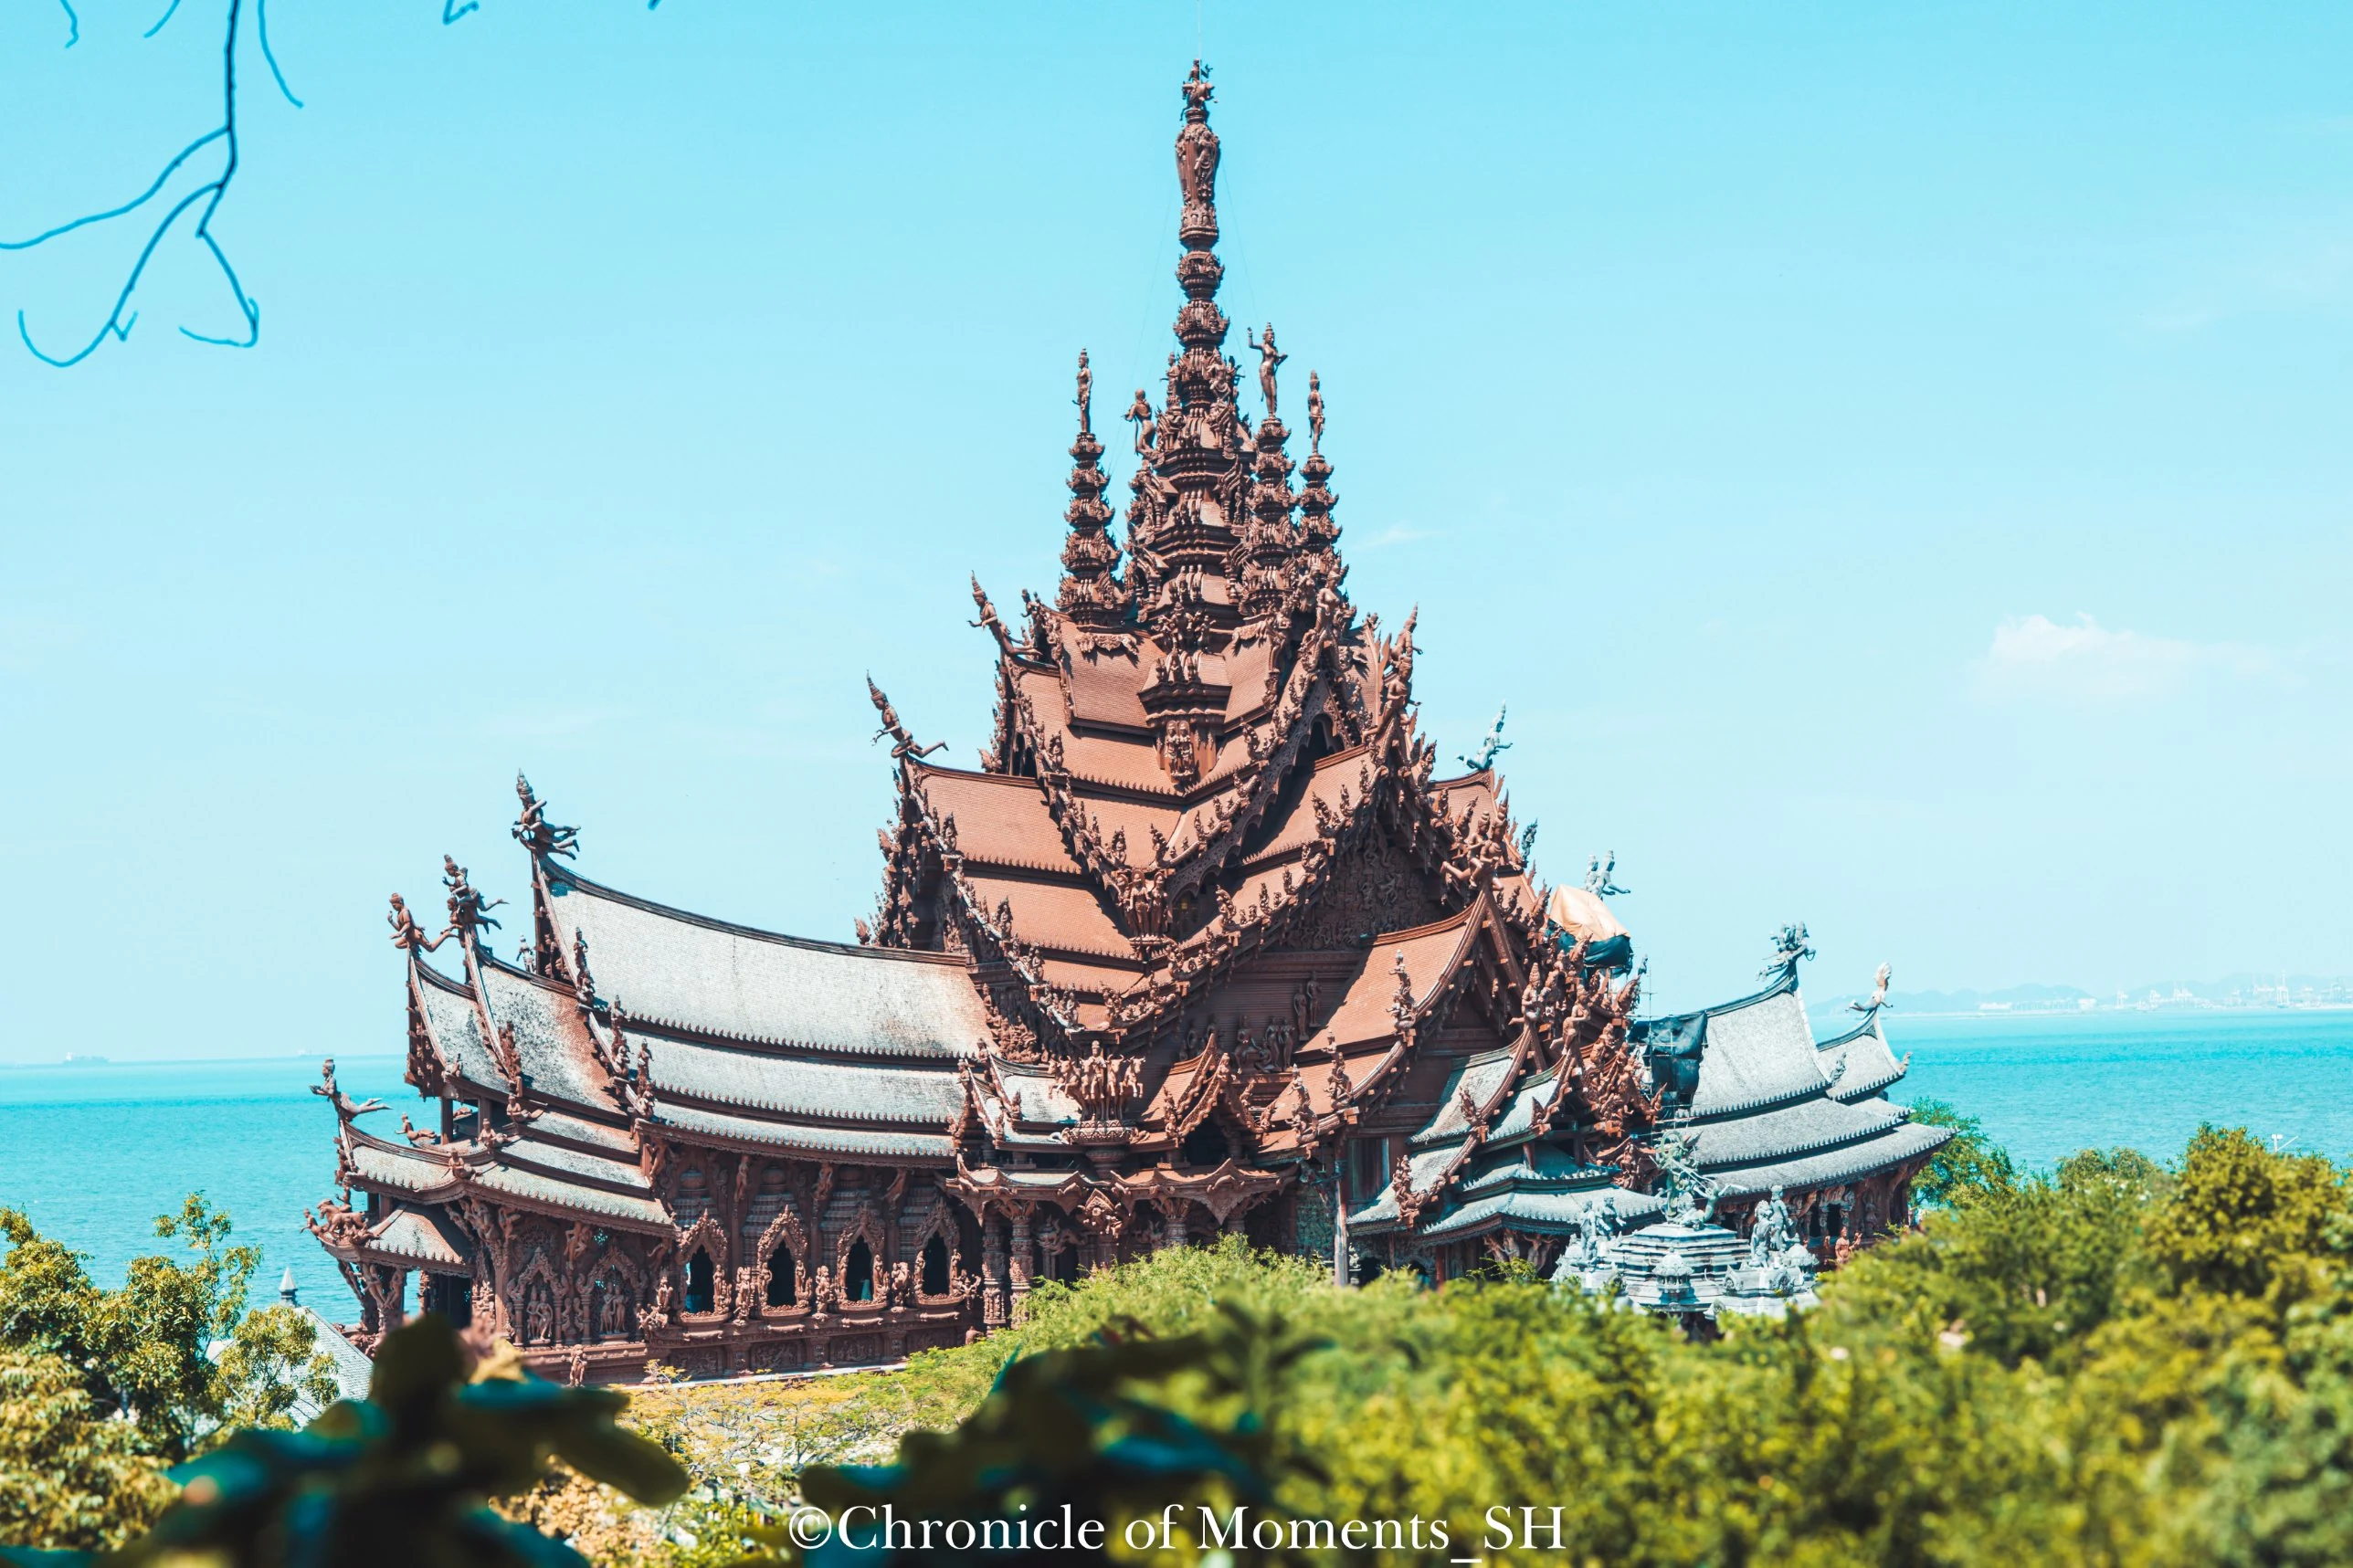
Canon EOS R7 · RF15-35mm F2.8 L IS USM · 27mm · F2.8 · ISO 100 · 1/800 s · 2024-11-03
(Click the photo to view it at full size)
Why Architecture Photos Feel Cramped: Check the Angle of View First
The first thing to decide when photographing a building is the angle of view. The wider it is, the more of the building and its surroundings fit in, which brings out the sense of scale, but edge distortion grows and the building looks smaller. A narrower angle lets you show part of the building larger and makes it easier to keep the surroundings tidy. The six photos here use four focal lengths: 15mm, 21mm, 25mm, and 27mm.
| Focal length | Full-frame equivalent (R7 × 1.6) | Diagonal angle of view (R7 sensor) | Use in this article |
|---|---|---|---|
| 15mm | about 24mm | about 83.5° | Front facade, whole dark interior |
| 21mm | about 34mm | about 65° | Exterior view between branches (vertical) |
| 25mm | 40mm | about 56° | Sculpture on the outer wall |
| 27mm | about 43mm | about 53° | Exterior view (horizontal) |
The R7 has an APS-C sensor, so multiplying the lens's marked focal length by 1.6 gives the focal length that produces the same view on full frame. The 15mm here matches a full-frame 24mm, a classic wide angle for architecture. The conversion is explained in the sensor size and crop factor guide, and you can work out angles of view yourself with the field of view calculator guide and the crop factor calculator.
One thing worth noticing is that wider is not always right. The first photo uses 27mm (about 43mm equivalent) to take in the whole building while giving the sky and sea plenty of room, while the front-facade shot goes all the way to 15mm so the pillars and roofs both fit. The focal length changes with how large you want the building and how much of its surroundings you want to show. I compared why wide-angle lenses matter in Do You Really Need a Wide-Angle Lens for Landscape Photography? as well.
Same Building, Vertical vs. Horizontal Frame
The horizontal photo above and the vertical photo below were taken 14 seconds apart, of the same scene. In the horizontal shot the building spreads sideways and the sea and horizon come into view, while in the vertical shot the spire cuts a long line up the center of the frame and its height is emphasized.
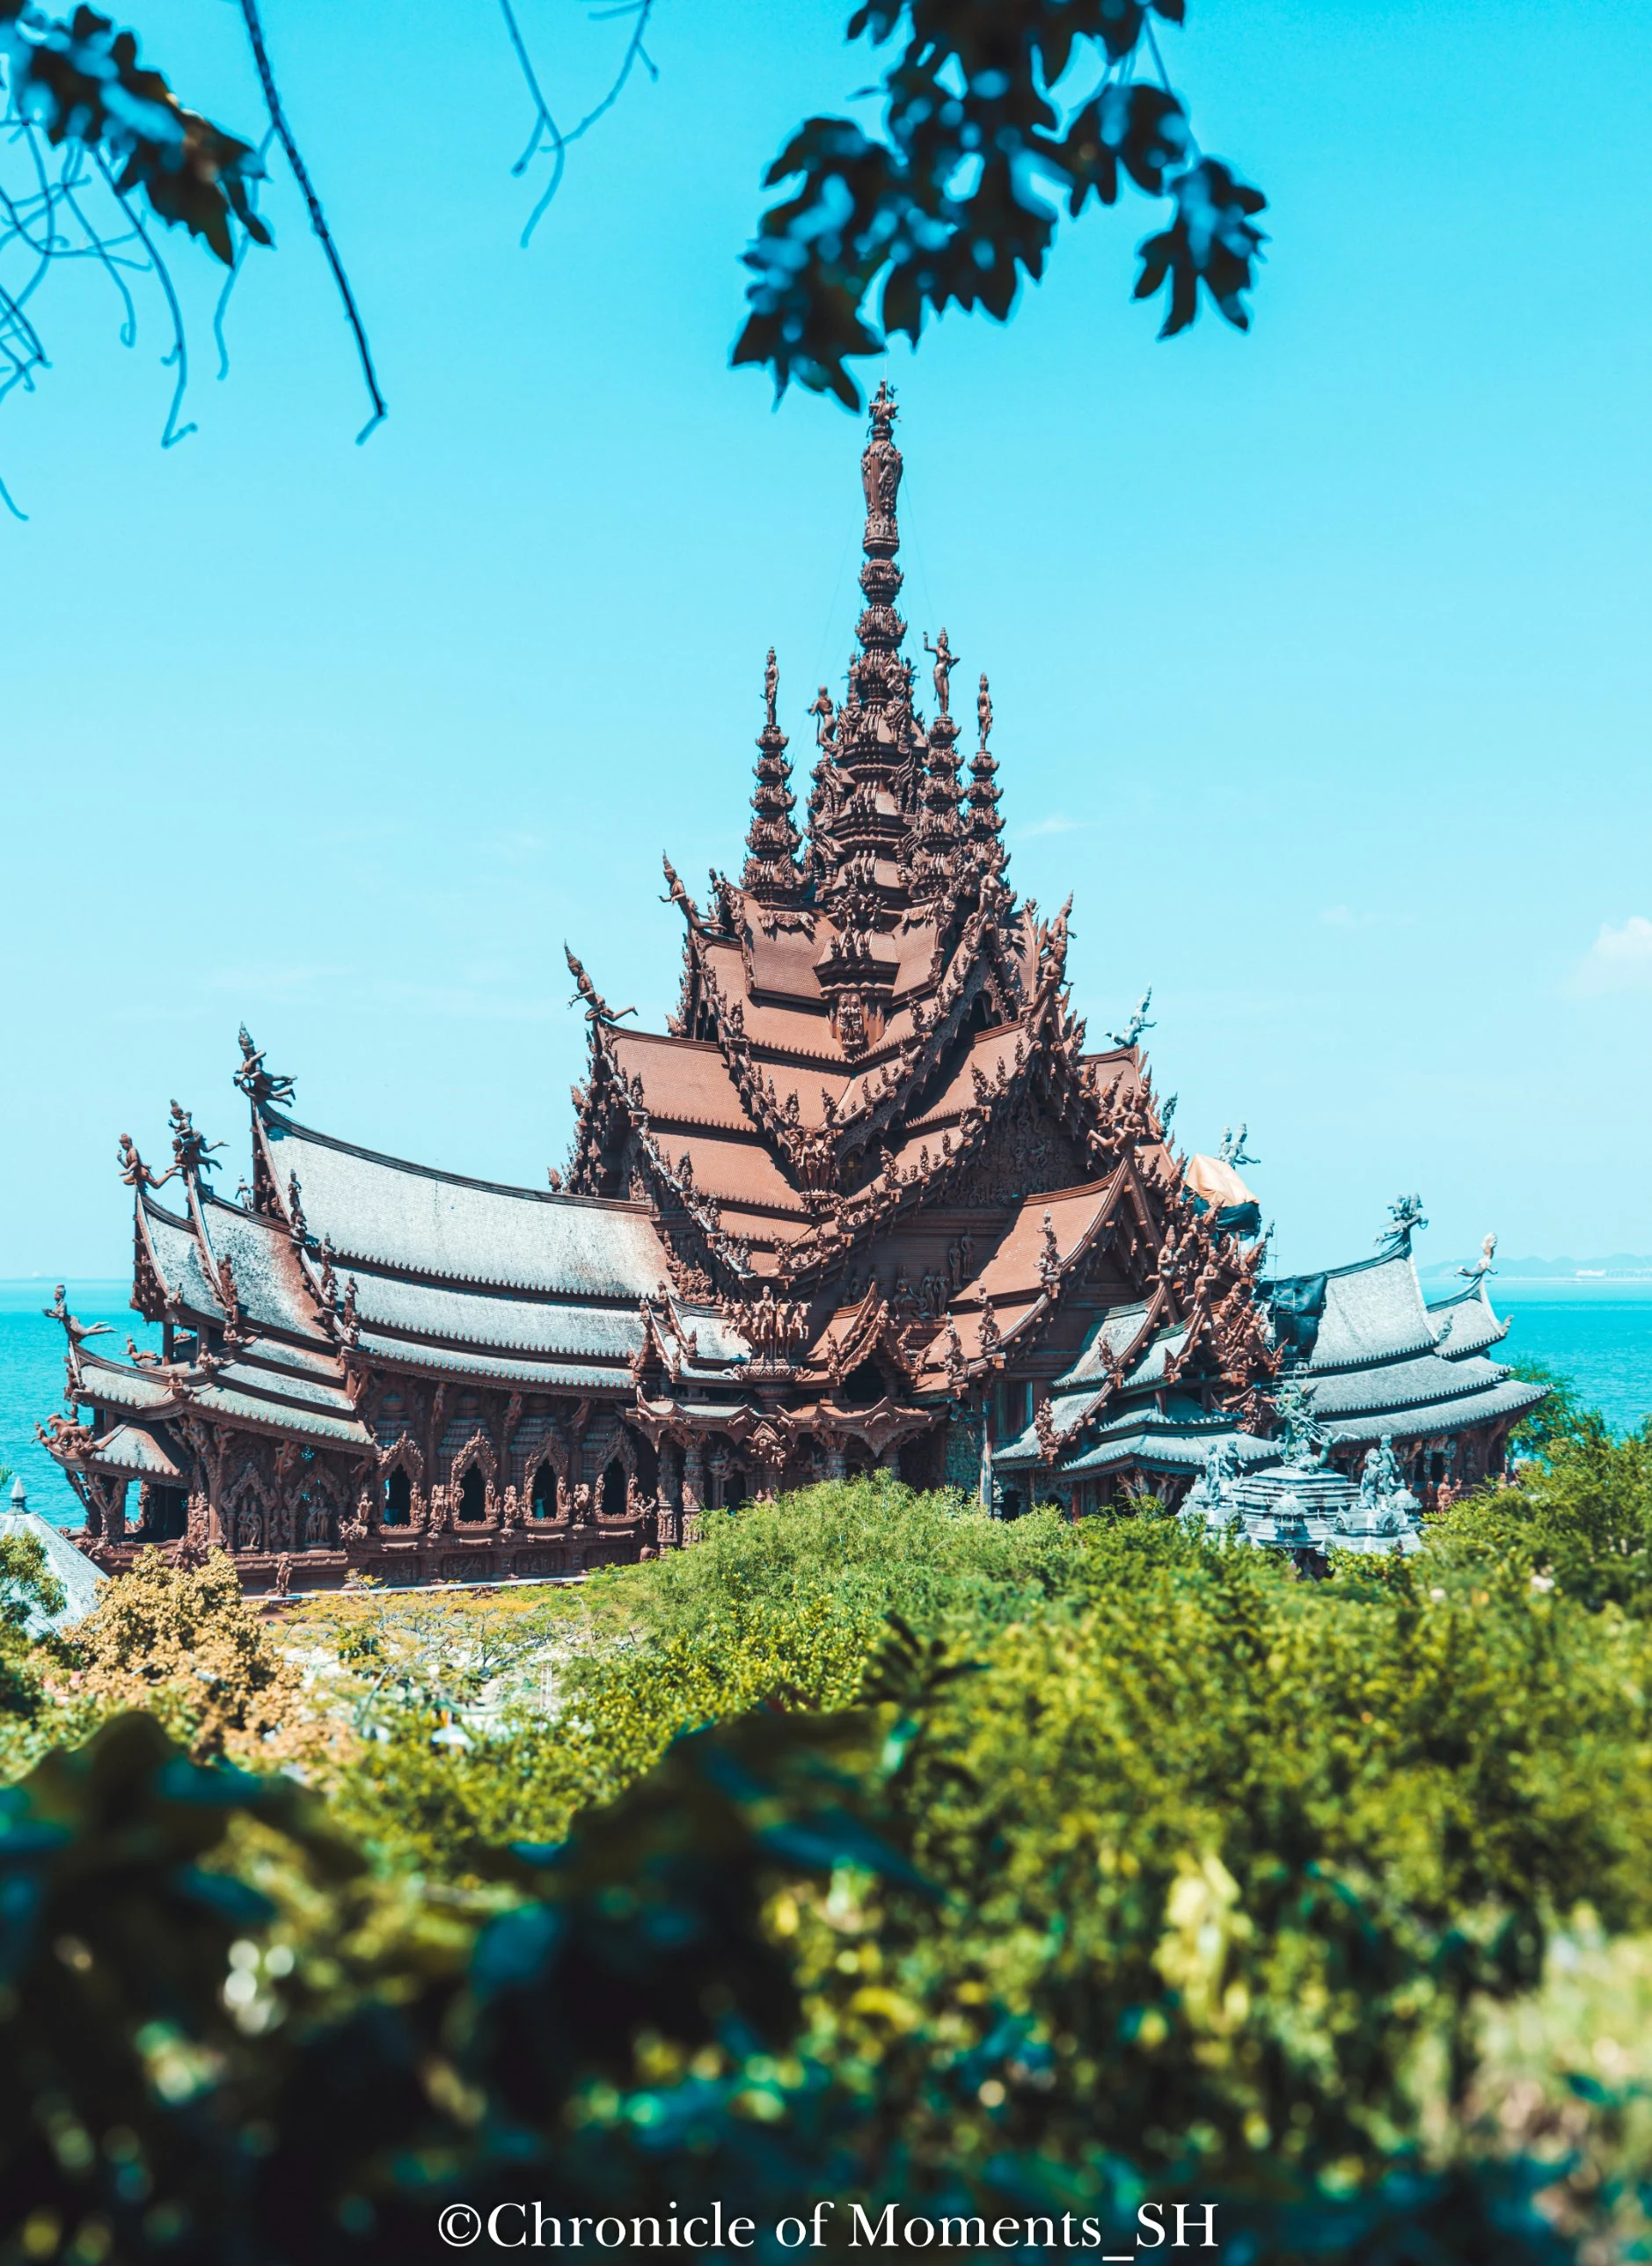
Canon EOS R7 · RF15-35mm F2.8 L IS USM · 21mm · F2.8 · ISO 100 · 1/800 s · 2024-11-03
(Click the photo to view it at full size)
The vertical shot was taken at 21mm (about 34mm equivalent), with leaves hanging across the top and bottom of the frame. Putting leaves or branches in front of a building like this adds depth, and the blurred foreground acts like a frame around it, drawing the eye to the middle. With the aperture open at F2.8, the nearby leaves soften while the building stays sharp. In the horizontal shot, by contrast, a branch only lightly enters the upper left corner, so the eye travels naturally from the building to the sea.
If height is what matters about a building, try a vertical frame first; if you want to show scale together with the surroundings, try horizontal. Shooting both is the safest habit, and the criteria for deciding which suits a scene are covered in Horizontal vs. Vertical Composition: How to Choose Photo Orientation for the Scene.
Front View and Symmetry: Conveying Size with a Wide Angle
When shooting a building head-on with a wide angle, where you put the center line decides most of the composition. The photo below was taken at 15mm (about 24mm equivalent), with the central spire placed on the center line of the frame. The roofs extend to either side at similar lengths, giving a near-symmetrical stability, while the pillars and stairs below lead the eye up and down together with the spire above.
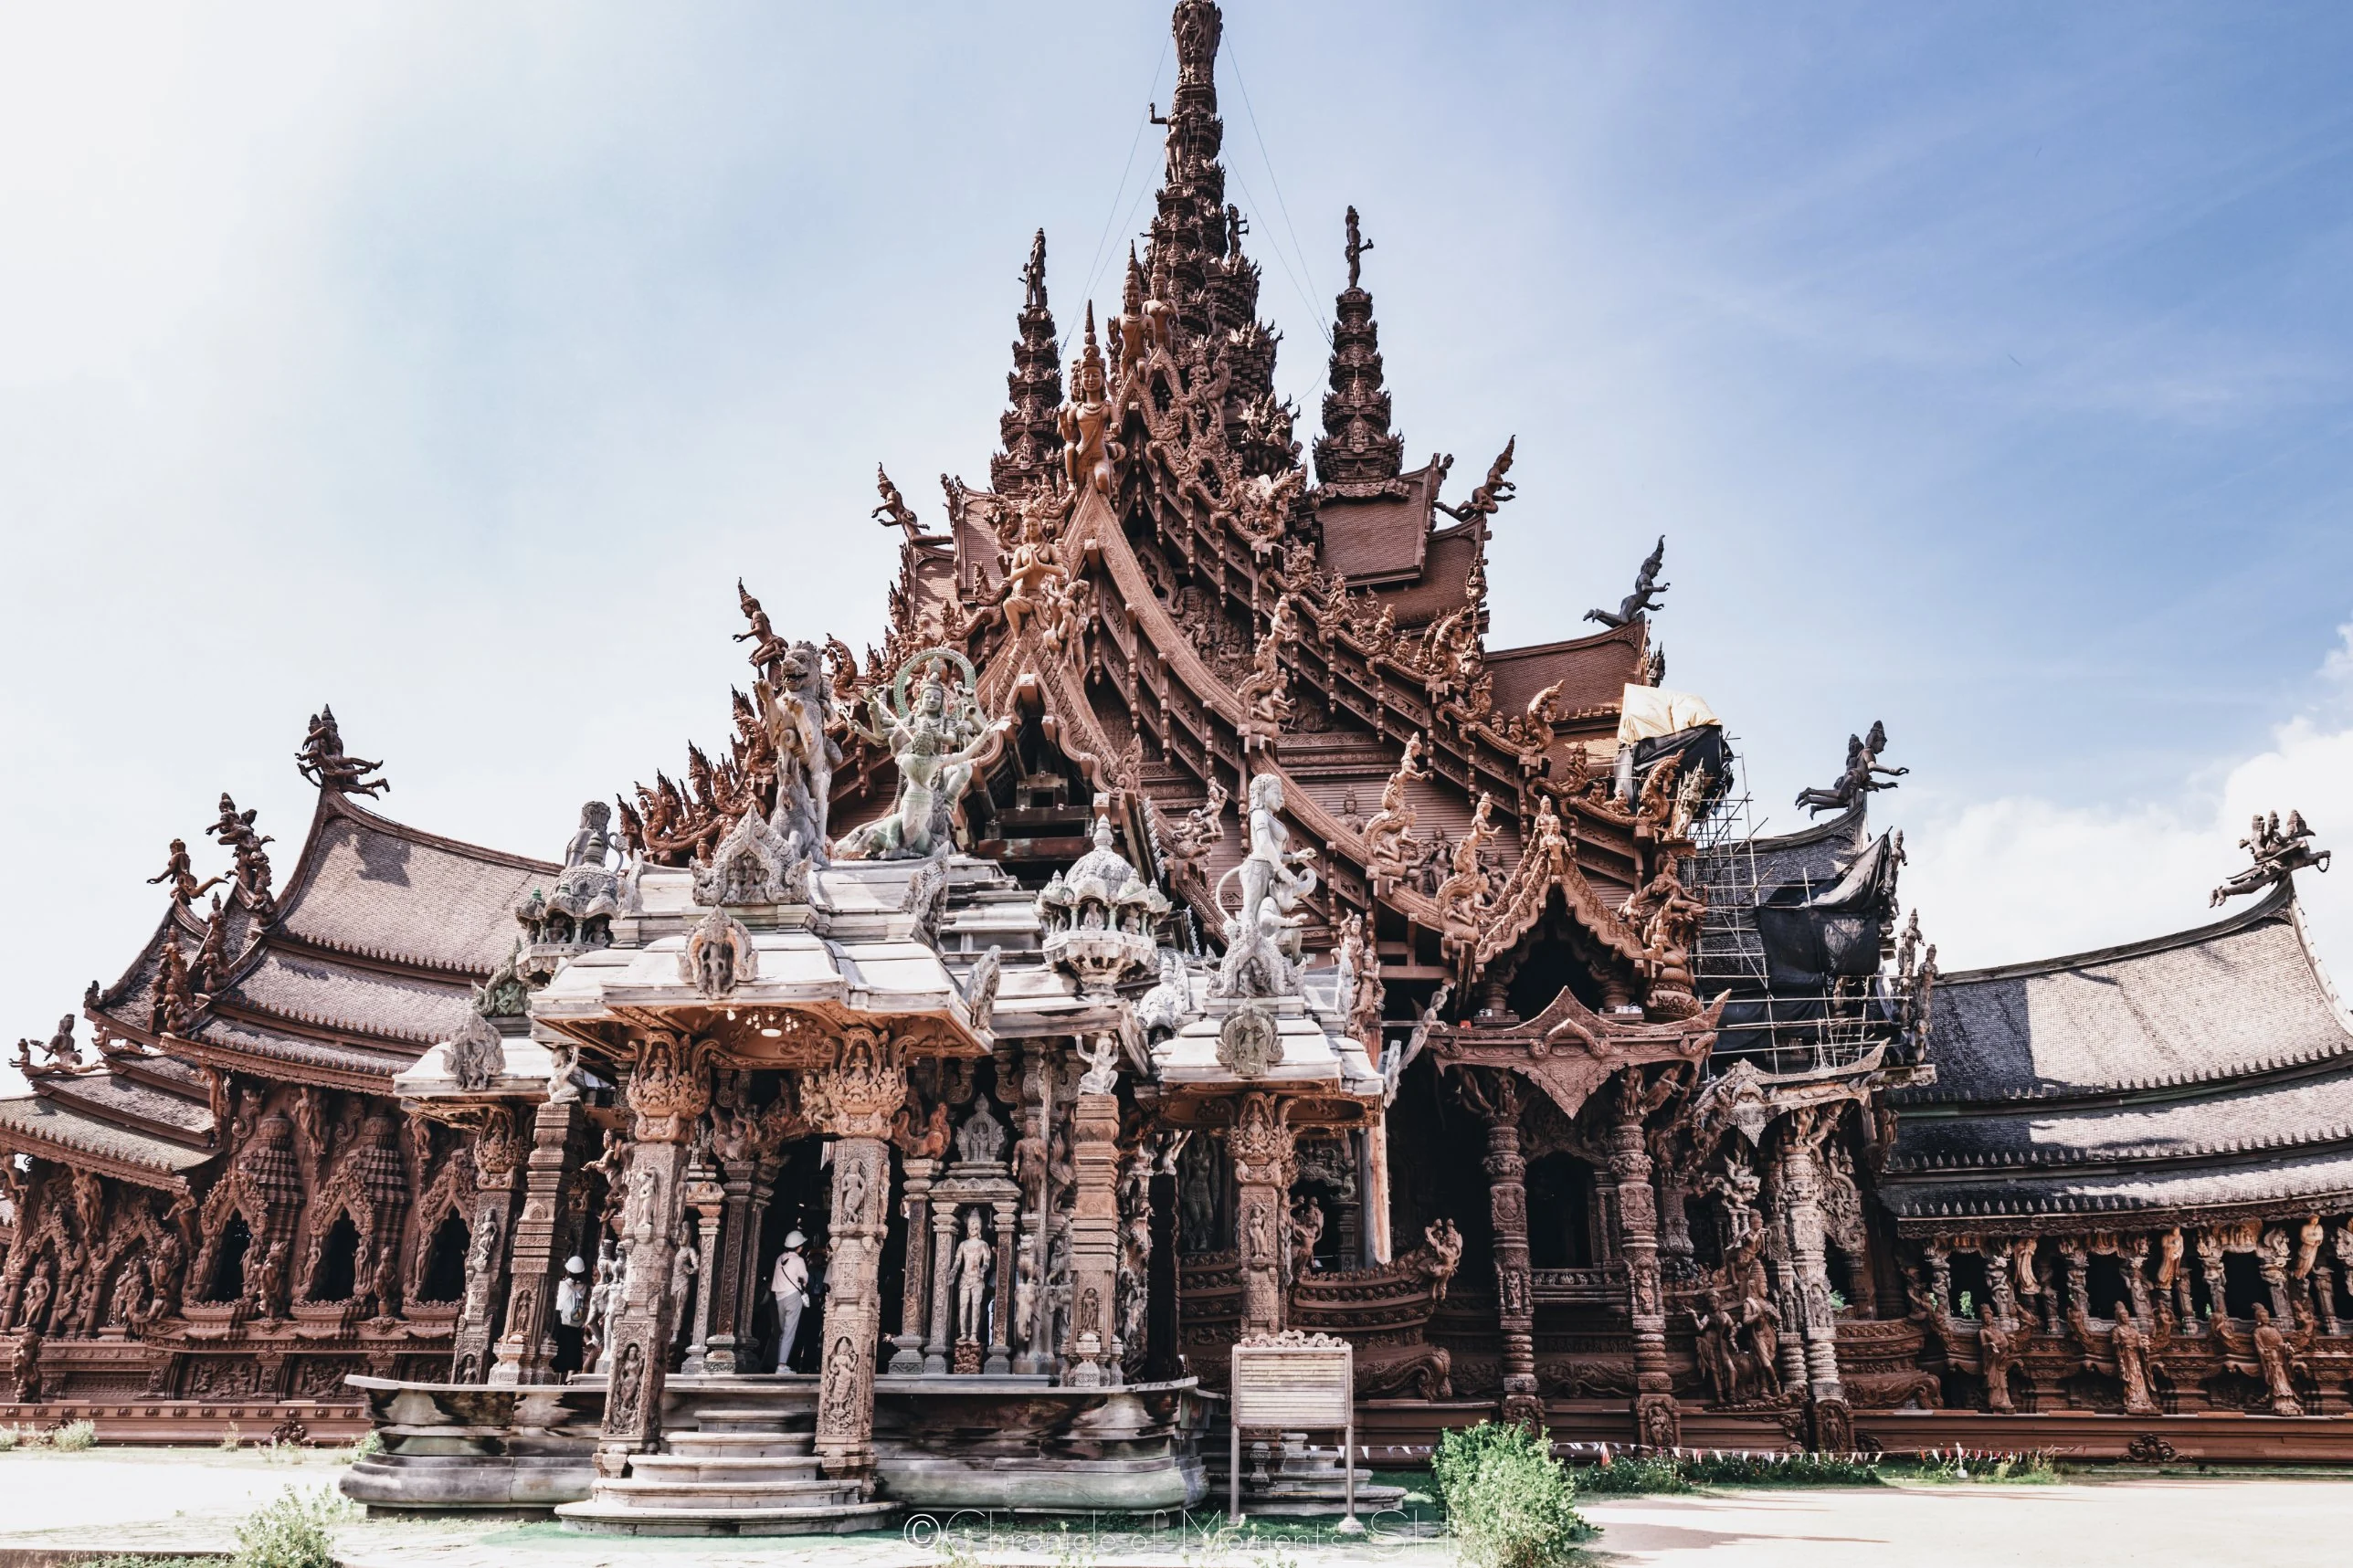
Canon EOS R7 · RF15-35mm F2.8 L IS USM · 15mm · F8 · ISO 100 · 1/80 s · 2024-11-03
(Click the photo to view it at full size)
A person standing at the entrance gives a sense of the building's size, and the scaffolding on the right shows that this is a building still under construction. Unlike the previous two photos, this one is stopped down to F8. In a front-facade shot where everything from the stairs in front to the spire behind needs to be sharp, a shallow depth of field would leave the front or the back blurred. The relationship between aperture and the range in focus is covered in the guide to understanding depth of field.
When you shoot a building with a wide angle, tilting the camera upward makes the building narrow toward the top. To reduce this, hold the camera level, include plenty of ground or steps at the bottom of the frame, and face the building squarely. Checking the left-right balance around the building's center with the grid lines makes the composition much steadier. Other basic checks are collected in 5 Composition Checks Before You Press the Shutter.
Detail Shots: Capturing the Texture of a Building
Shooting only the whole building hides its fine workmanship, so you also need shots where you move in close and capture the carvings or decoration separately. The photo below shows a sculpture on the outer wall at 25mm (40mm equivalent), in a vertical frame that keeps the central sculpture in the middle with the carving above and the base ornament below both visible.
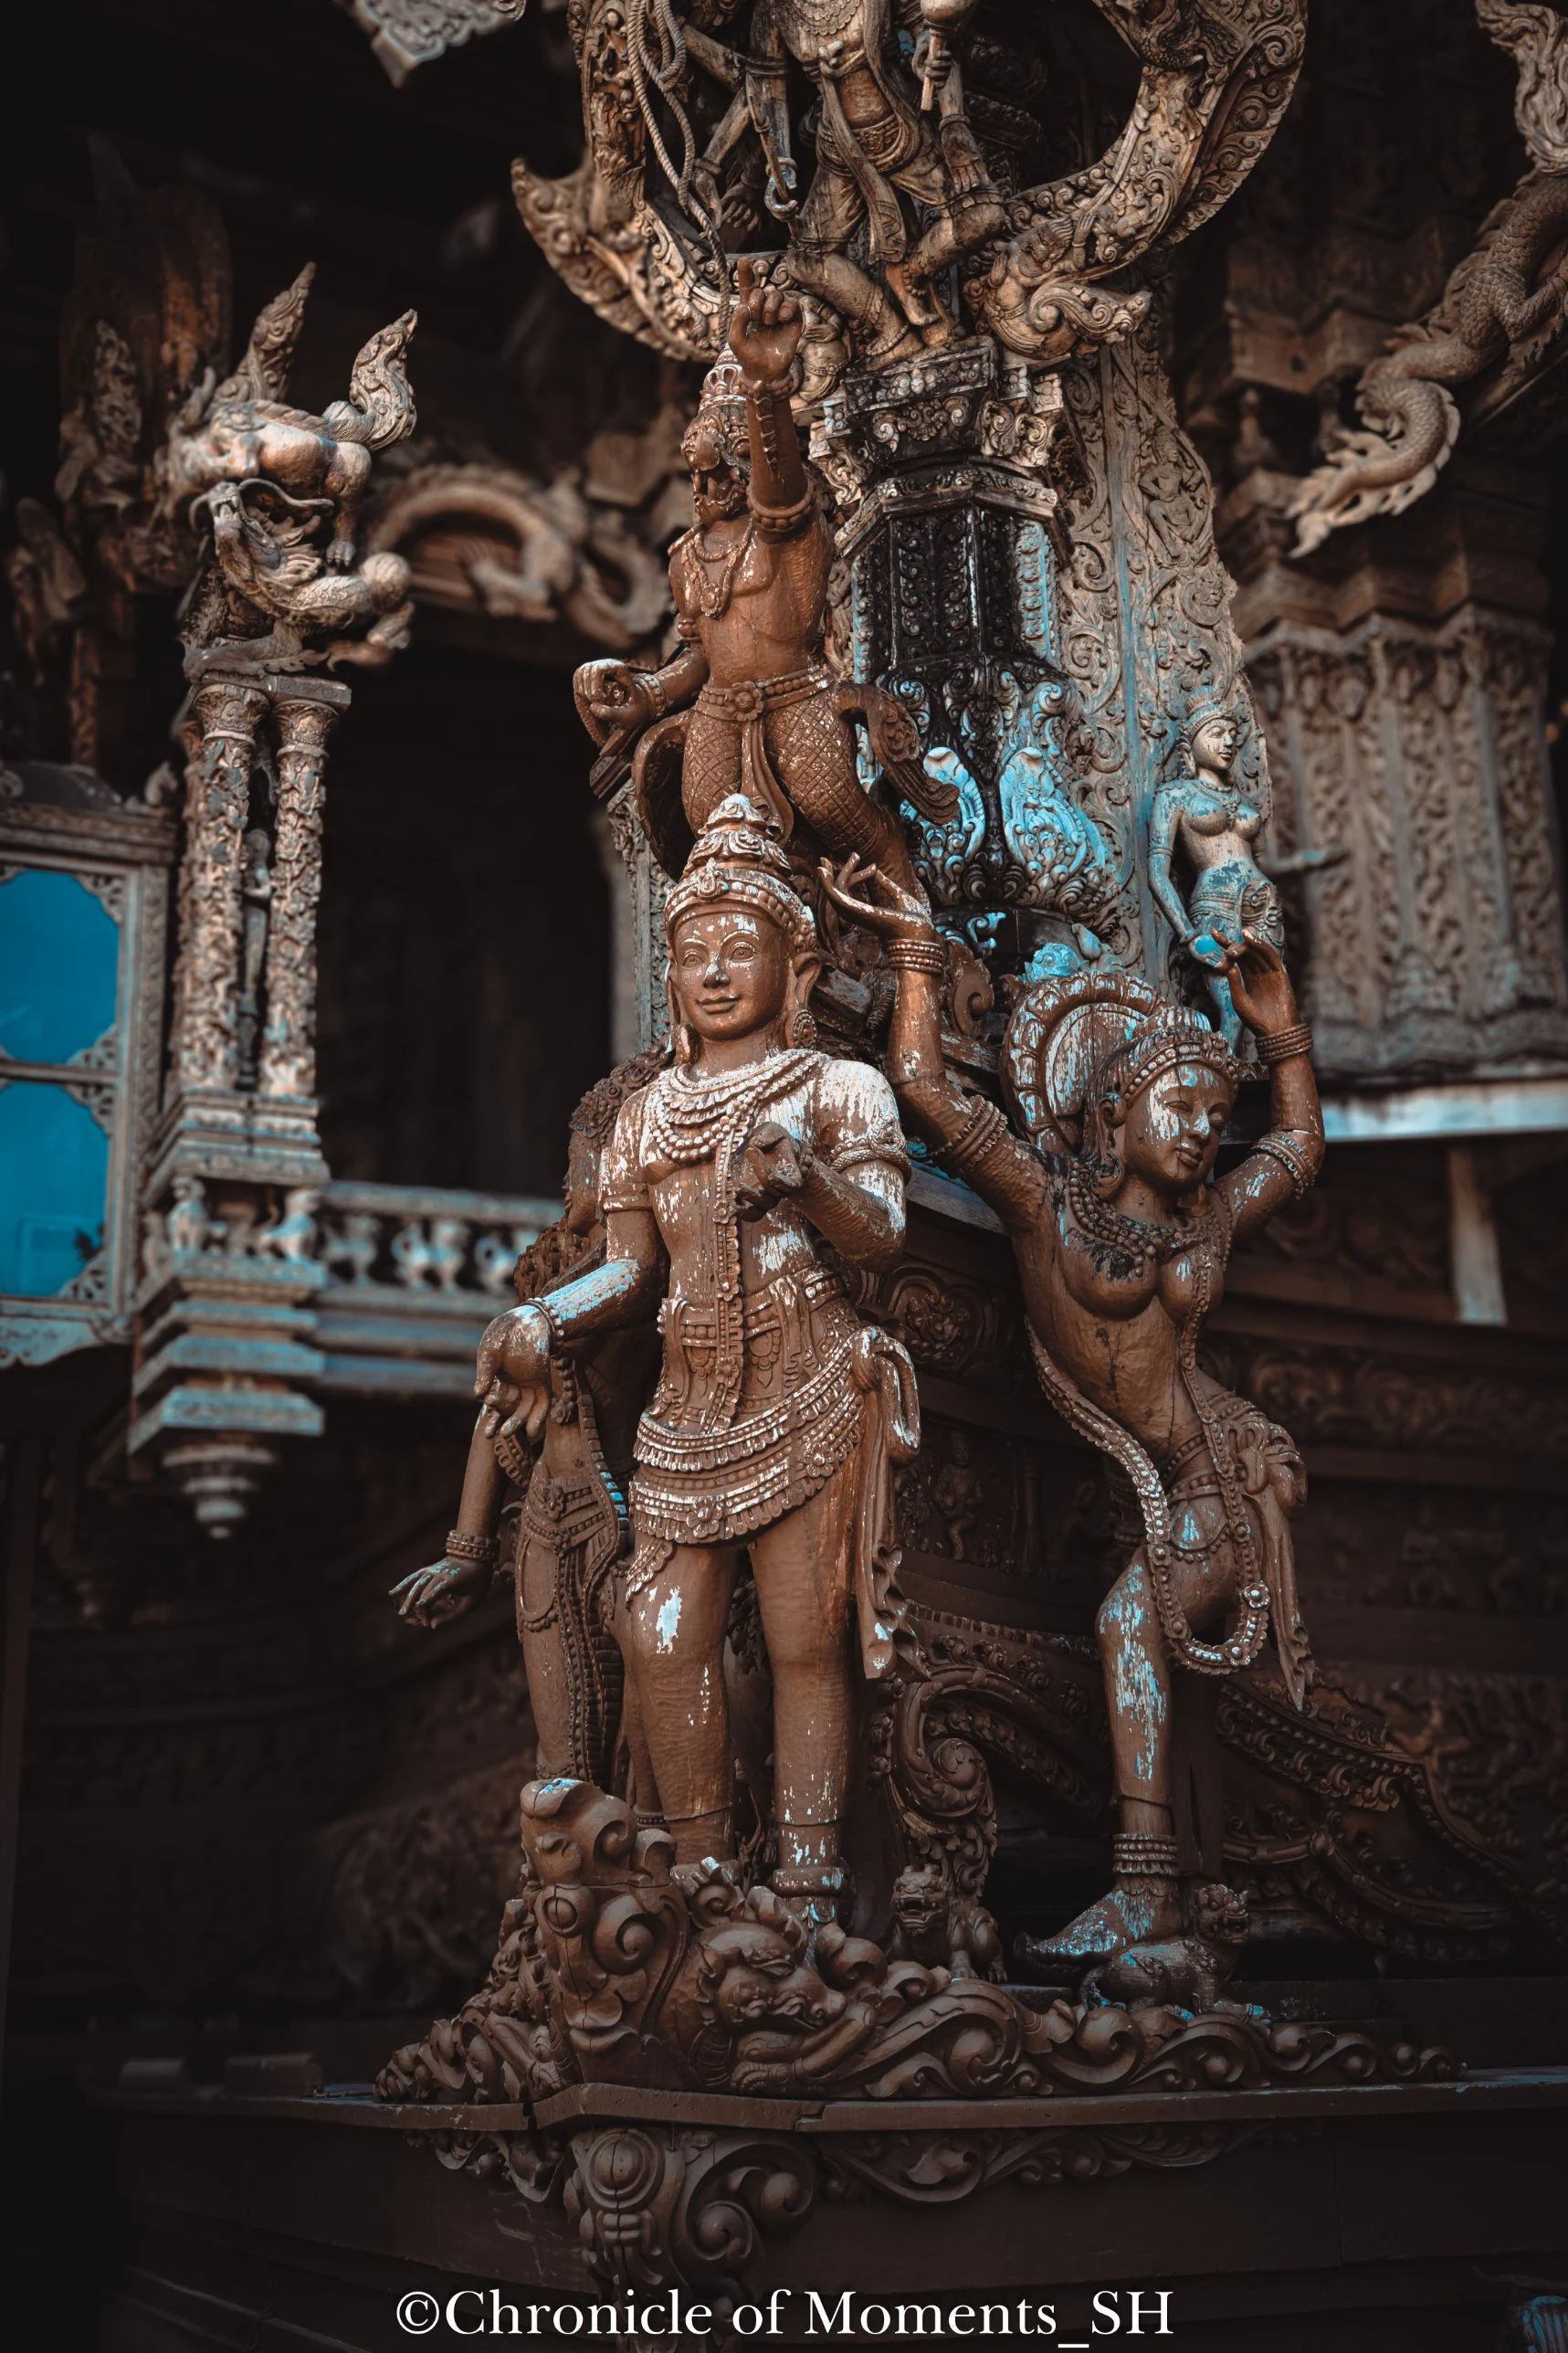
Canon EOS R7 · RF15-35mm F2.8 L IS USM · 25mm · F2.8 · ISO 100 · 1/320 s · 2024-11-03
(Click the photo to view it at full size)
Opening the aperture to F2.8 keeps the sculpture crisp while the busy decoration behind it and the eave on the left melt away softly. In a building with carvings layered on top of each other, a fully sharp background gives too much information and the subject gets lost, so keeping one part sharp and blurring the rest lets the eye settle naturally on the sculpture's face and gesture. A shutter speed of 1/320 s is fast enough to shoot handheld at a 40mm equivalent angle of view.
Shooting a Dark Interior Without a Tripod: 1/2 s and 1/30 s
Unlike the outside, the inside of the building has far less light. The two photos below were taken inside the same building at 15mm (about 24mm equivalent), F2.8, and ISO 100, differing only in shutter speed: 1/2 s and 1/30 s. Both were shot handheld, without a tripod.
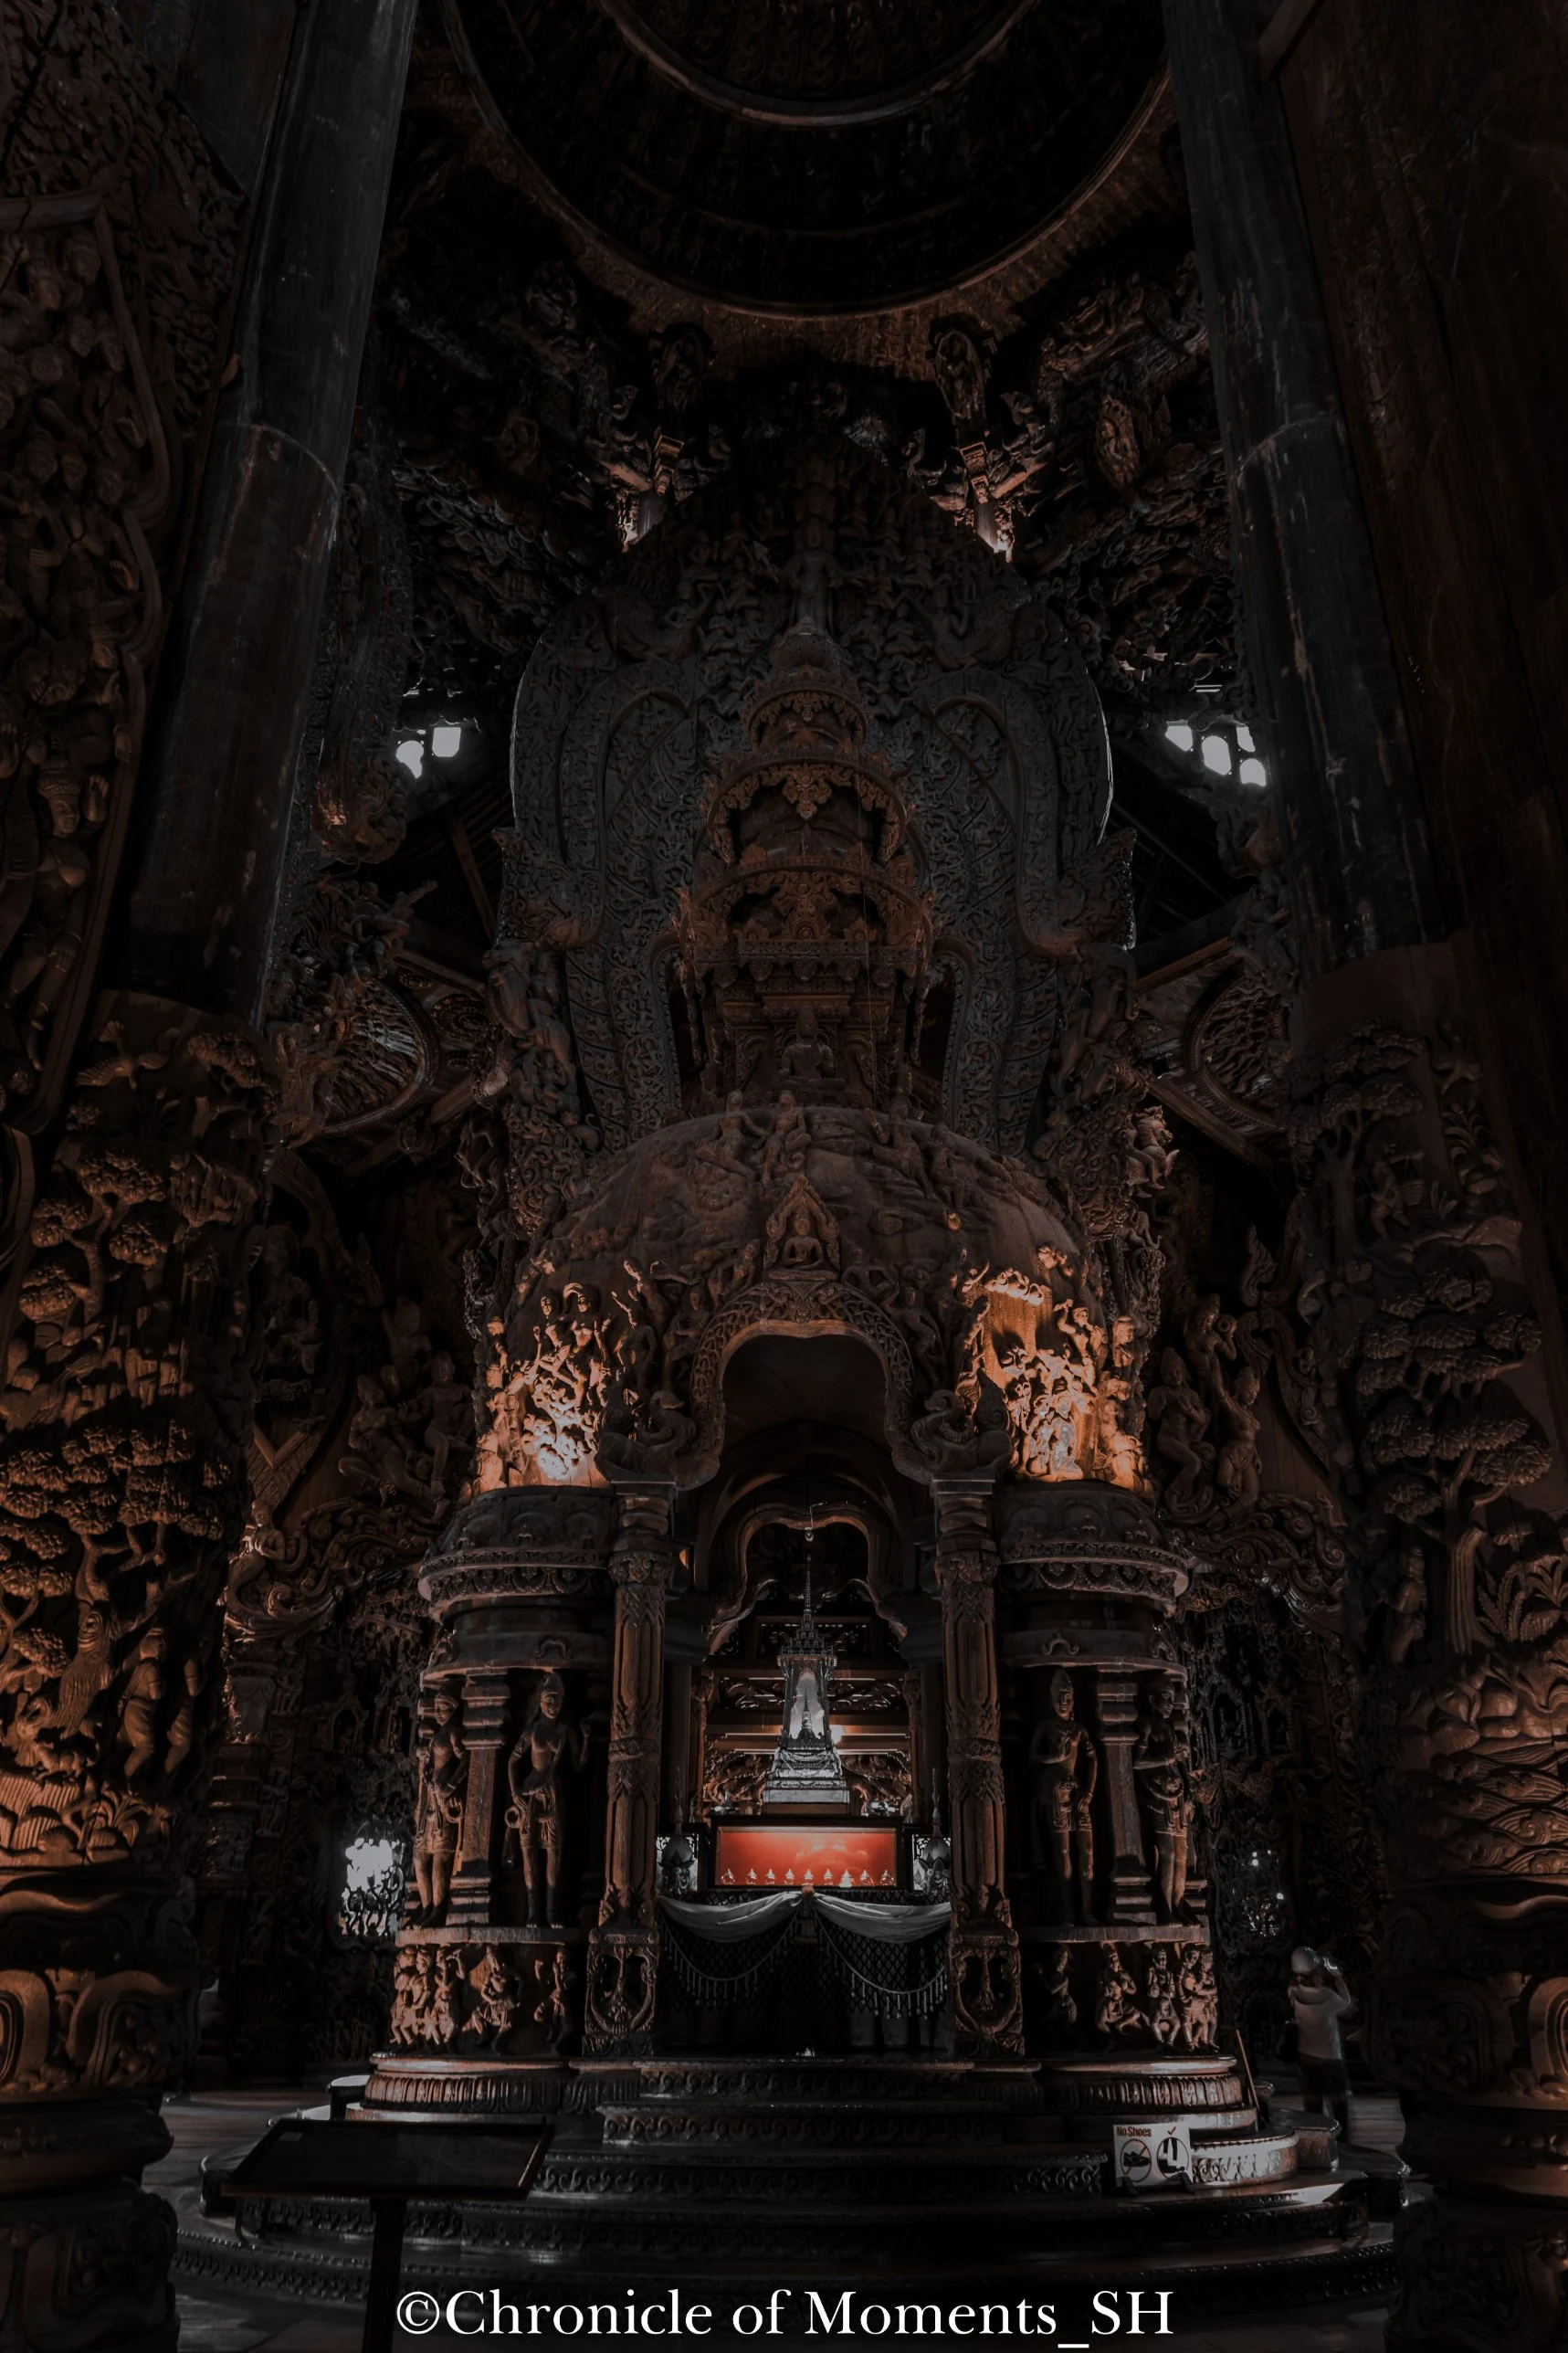
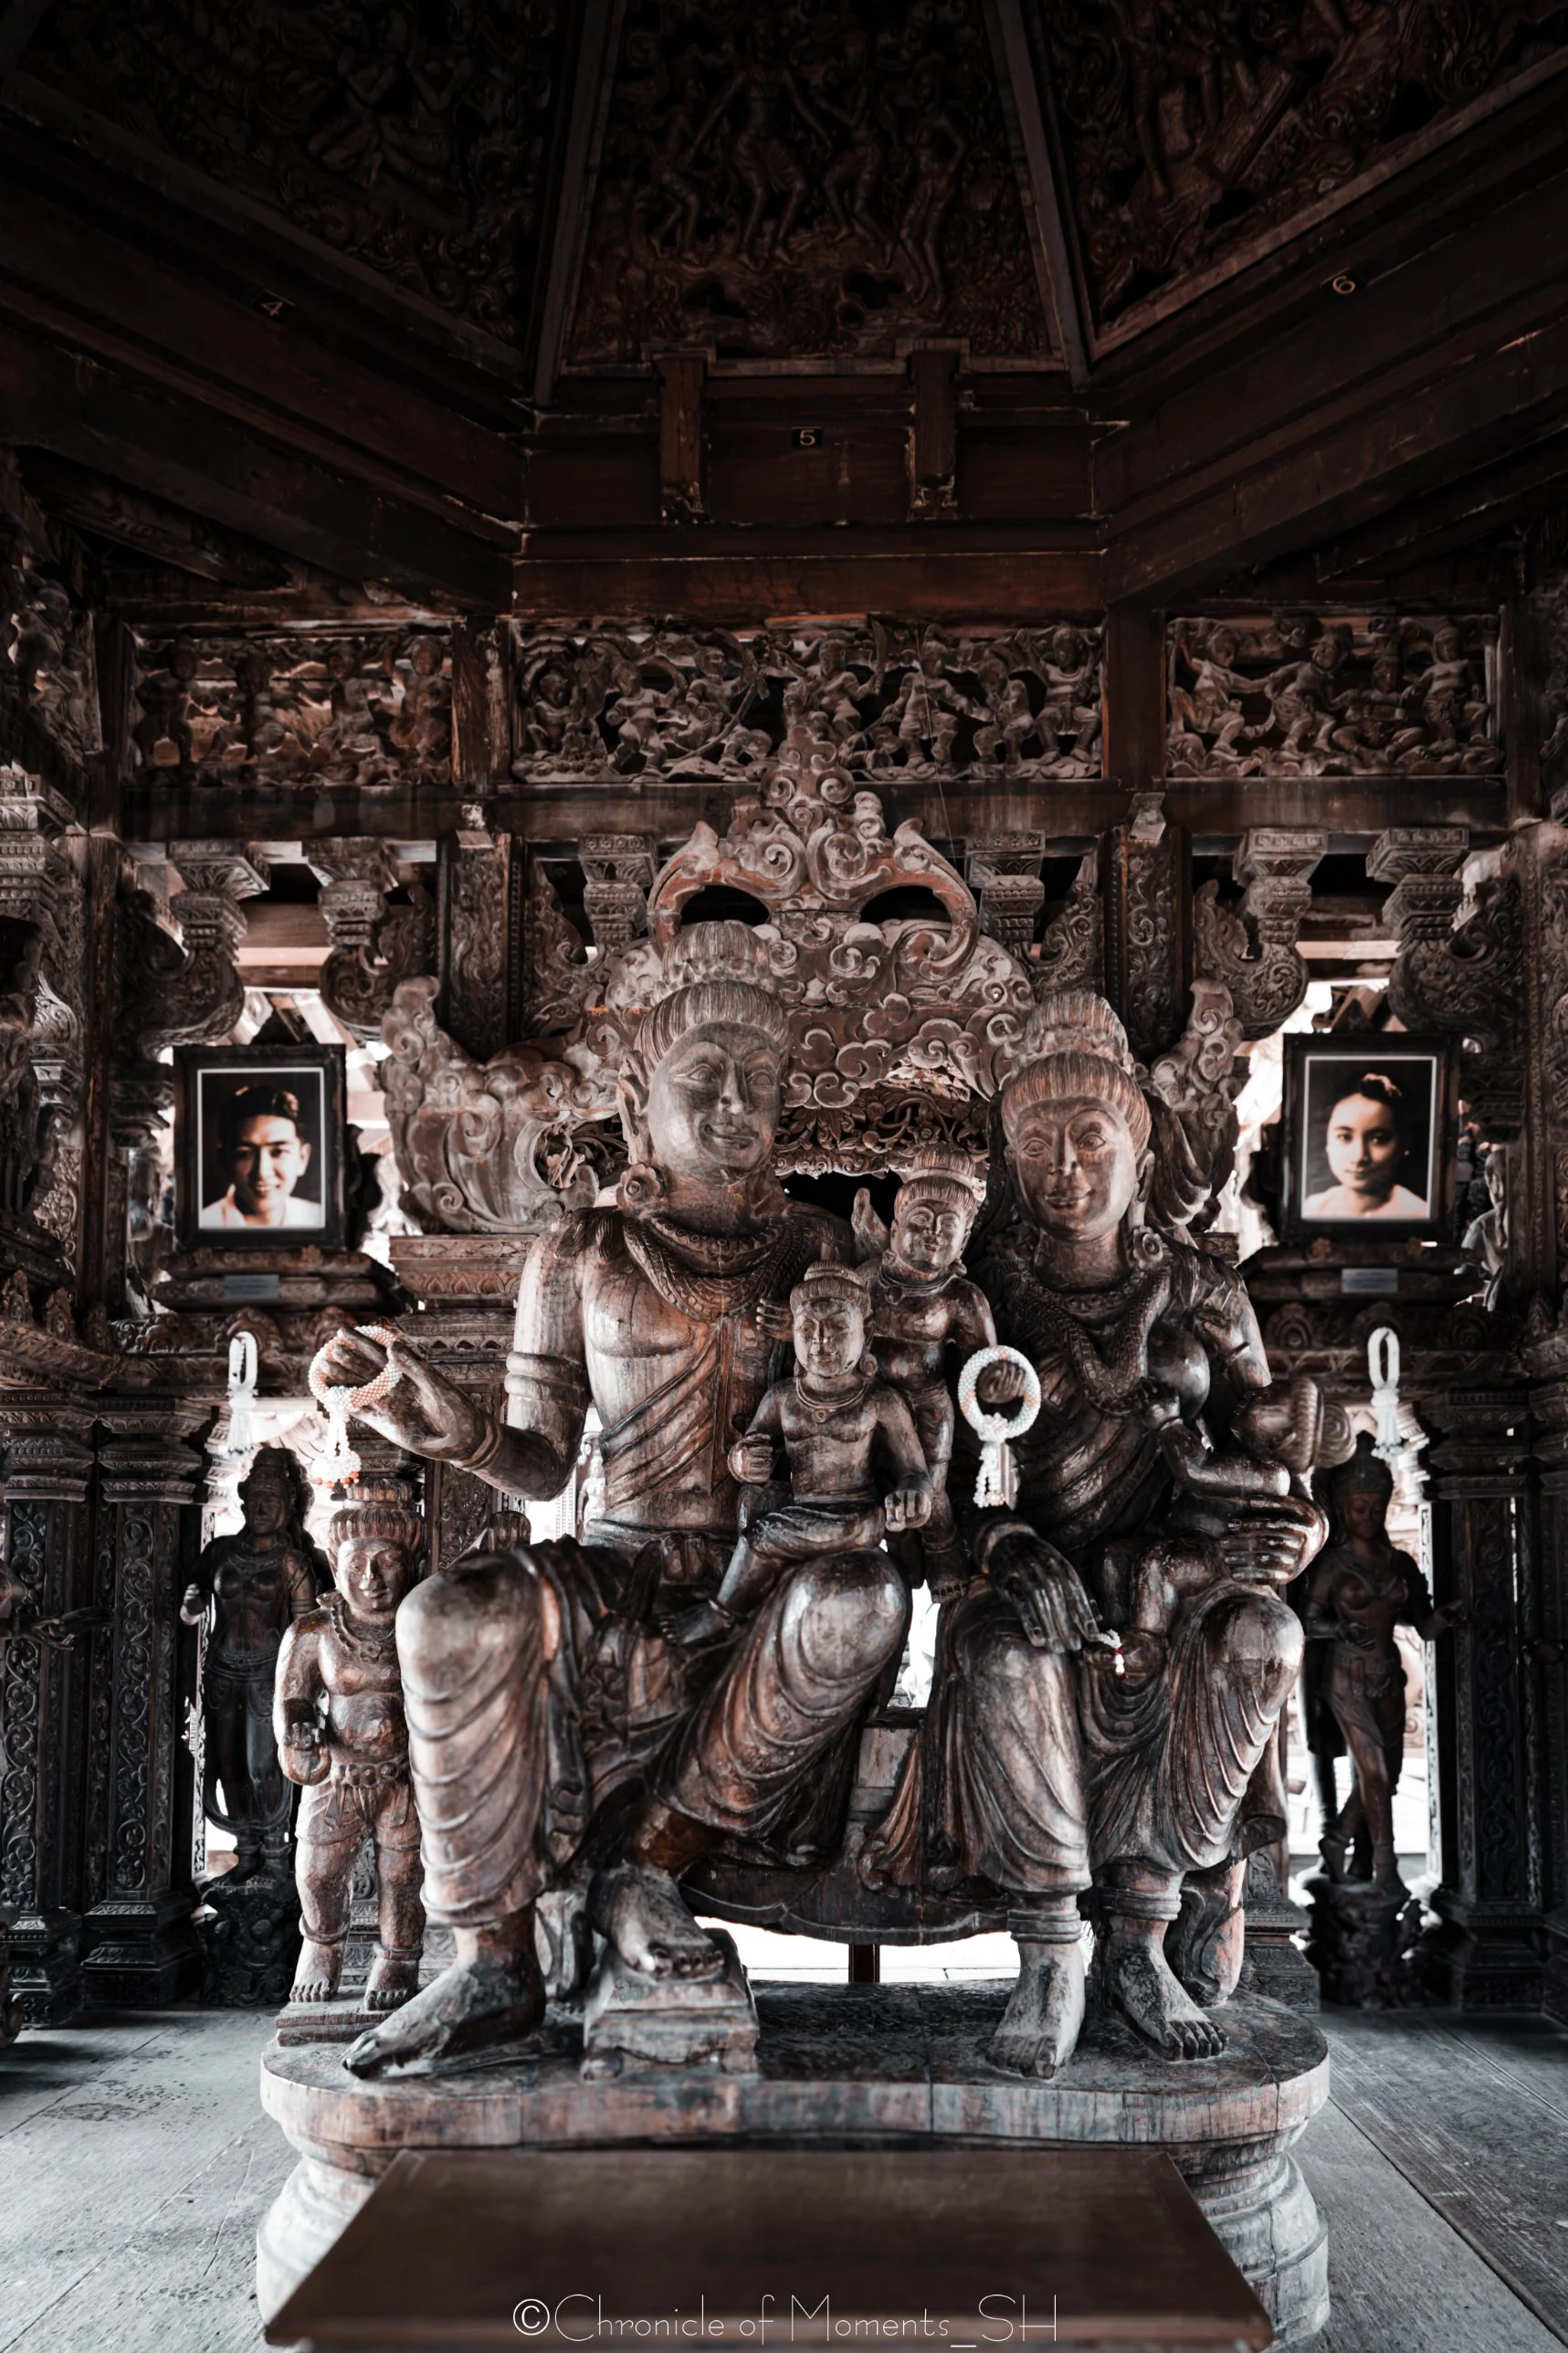
(Click a photo to view it at full size)
The photo on the left faces the central altar at the back of the building. The ceiling above and the large pillars on both sides surround the edges of the frame, with the altar in the middle drawing the eye to one spot in a left-right symmetrical composition. The carved parts touched by light come alive while the rest sinks into darkness, which emphasizes the depth and mood of the space. This was the darkest spot, so the shutter speed had to drop to 1/2 s.
The photo on the right has the family sculpture in the center, with framed pictures on both walls forming a left-right symmetry. The lines of the ceiling beams and rafters converge inward and lead the eye to the central sculpture, while bright light coming in from the entrance behind it lifts the figures' outlines. It was brighter than the altar scene, so 1/30 s was possible.
The exposure difference between the two is about 3.9 stops. 1/2 s is 15 times longer than 1/30 s, and 15 is about 2 to the power of 3.9. At the same F2.8 and ISO 100, that is how much brighter one scene was than the other.
To avoid shake when shooting handheld, a rough safe line is a shutter speed close to the reciprocal of the focal length. The R7's 15mm is a 24mm equivalent, so the line is about 1/24 s, and in practice around 1/30 s. The 1/30 s on the right sits at that line, while the 1/2 s on the left is about 4 stops slower, a range that depends heavily on stabilization performance and your posture. At such speeds, holding your breath, leaning against a pillar or wall, and shooting several frames in a row to pick the least shaky one is the realistic approach. The principle and limits of image stabilization are covered in the image stabilization guide.
If 1/2 s feels risky, you can raise the ISO to shorten the shutter speed. Under the same conditions, raising ISO to 800 makes the shutter speed 3 stops faster, 1/16 s. In a dark interior like this, deciding which of aperture, shutter speed, and ISO to give up is the core of the shoot. Why a fast lens helps indoors is covered in more depth in Why Indoor Photography Needs a Fast-Aperture Lens.
F8 Outside, F2.8 Inside: Converting Exposure to Stops
Putting the exposures of all six photos in one table shows at a glance how aperture and shutter speed differ. Combinations that give the same brightness follow a rule: each stop you close the aperture, the shutter speed becomes twice as slow, and from F2.8 to F8 is about 3 stops.
| Photo | Settings | Shutter speed converted to F2.8 | Shutter speed converted to F8 |
|---|---|---|---|
| 1·2 Exterior view | F2.8 · 1/800 s | 1/800 s | about 1/100 s |
| 6 Front facade | F8 · 1/80 s | about 1/650 s | 1/80 s |
| 3 Outer wall sculpture | F2.8 · 1/320 s | 1/320 s | about 1/40 s |
| 5 Family sculpture (interior) | F2.8 · 1/30 s | 1/30 s | about 1/4 s |
| 4 Central altar (interior) | F2.8 · 1/2 s | 1/2 s | about 4 s |
Three things stand out from this table. First, the exterior view (photos 1 and 2) and the front facade (photo 6) were exposed to almost the same brightness, differing only in aperture. Second, compared at the same F2.8, the exposure difference between the brightest exterior view and the darkest central altar is about 8.6 stops, roughly 400 times in time. Third, stopping the central altar down to F8 would need about 4 seconds, which is practically impossible without a tripod.
That is why, even for the same building, the roles split: outside you close the aperture to secure sharpness, and inside you open it fully to secure shutter speed. Using F8 for the front facade worked because the bright exterior still allowed a comfortable 1/80 s. To calculate exposure in stops, try the exposure stops calculator, and for using exposure compensation in bright or dark scenes, see the guide to using exposure compensation.
Architecture Shooting Settings at a Glance
| Photo | Scene | Focal length (equiv.) | Aperture | Shutter speed | ISO | Time taken |
|---|---|---|---|---|---|---|
| 1 | Exterior view (vertical) | 21mm (34mm) | F2.8 | 1/800 s | 100 | 14:15 |
| 2 | Exterior view (horizontal) | 27mm (43mm) | F2.8 | 1/800 s | 100 | 14:15 |
| 3 | Outer wall sculpture | 25mm (40mm) | F2.8 | 1/320 s | 100 | 14:36 |
| 4 | Interior central altar | 15mm (24mm) | F2.8 | 1/2 s | 100 | 14:40 |
| 5 | Interior family sculpture | 15mm (24mm) | F2.8 | 1/30 s | 100 | 15:25 |
| 6 | Front facade | 15mm (24mm) | F8 | 1/80 s | 100 | 15:29 |
All six were shot at ISO 100 to keep image quality at its cleanest, and in exchange I accepted slower shutter speeds in the dark scenes. Which side to prioritize depends on whether the subject moves and how much risk of shake there is.
Checklist
- Did you choose the focal length based on how large you want the building and how much of its surroundings to show?
- Did you shoot both vertical and horizontal frames and compare which brings out the building's character better?
- For a front view, did you check the center line and left-right balance with the grid lines?
- Can you put leaves or branches in front of the building as a foreground to create depth?
- In a dark interior, have you decided which of aperture, shutter speed, and ISO to give up?
- At slow shutter speeds, did you brace your body and shoot several frames in a row?
Common Mistakes: Using the Same Settings Inside as Outside
The most common mistake is carrying settings made for the bright outdoors straight into the interior. Walking into a dark room with settings like F8 and 1/80 s leaves the frame nearly black, because as calculated in this article you have to make up a gap of close to 8 stops. The moment you go inside, you need to decide again whether to open the aperture and raise the ISO or let the shutter speed run slow.
The second mistake is taking only one frame at a slow shutter speed and never checking it. At speeds like 1/2 s, shake can be hard to notice by eye, so shoot several frames and zoom in to pick the sharp one. The third is tilting the camera upward when shooting a building with a wide angle. When the vertical lines converge toward the top, the photo looks unstable, so keep the camera level where possible and leave plenty of margin.
FAQ
What angle of view works well for architecture photos?
To show the whole building together with its surroundings, a wide angle around 24mm full-frame equivalent is common, and when you want to tidy up and show part of it, about 35 to 50mm equivalent is also useful. In this article I switched between 15mm and 27mm (24mm to about 43mm equivalent) to suit each scene.
Is a shutter speed like 1/2 s possible without a tripod?
It depends on the stabilization of the camera and lens, so the success rate is low and shake can appear depending on the scene. The realistic approach is to find something to lean on, hold your breath, shoot several frames in a row, and choose the sharpest. If you feel unsure, raising the ISO to shorten the shutter speed is safer.
Why use different apertures outside and inside?
Outside there is plenty of light, so you can stop down and still keep a fast shutter speed, and around F8 is used for sharpness across the whole building. Inside there is not enough light, so you have to open the aperture to secure a shutter speed, and all the interior photos in this article were shot at F2.8.
Is there a reason you kept ISO at 100?
The lower the ISO, the cleaner the image, so all six photos here stayed at ISO 100. In exchange, the shutter speed dropped as low as 1/2 s in the dark interior, and whether to raise the ISO is a choice you can adjust.
Putting It Together
For architecture photos, the basics are to use the angle of view to decide how large the building appears, choose a vertical or horizontal frame depending on whether you want to emphasize height or scale, and check the center line and symmetry in front views. Interiors differ from the outside by about 8 stops or more even in the same building, so you need to open the aperture and decide in advance whether to give up shutter speed or ISO to reduce shake without a tripod. For these six photos, I split F2.8 and F8 to suit each scene outside, and inside I stayed at F2.8 and ISO 100 and changed only the shutter speed between 1/2 s and 1/30 s. You can continue with interior aperture and lens choice in Why Indoor Photography Needs a Fast-Aperture Lens.
Copyright Notice
All photos used in this post are works taken directly by the site operator (Chronicle of Moments_SH). Photographs are protected as photographic works under Article 4(1)(ix) of the Korean Copyright Act, and copyright arises from the moment of shooting without any registration or other procedure (Article 10(2)).
Without the copyright holder's prior permission, it is prohibited to reproduce the photos in this post (Article 16), to post or transmit them on blogs, forums, social media, or communities (public transmission, Article 18), or to modify or edit them into derivative works (Article 22). Removing or altering the copyright notice and frame in a photo can also infringe the right of attribution (Article 12) and the right to integrity (Article 13). Uses the law permits, such as fair quotation of a published work (Article 28) or use within a private or domestic scope (Article 30), are exceptions.
Unauthorized use can lead to injunction claims (Article 123) and damages claims (Article 125), and can be punished by imprisonment of up to 5 years or a fine of up to 50 million won (Article 136(1)). For-profit or habitual infringement can be punished even without a complaint (Article 140).
Photo-use inquiries: skysmoga@gmail.com
© Chronicle of Moments_SH. All rights reserved.