When people think of autumn landscape photography, mountains and fields of fall color come to mind first, but a park in the middle of a city can give you plenty of good photos too. Skyscrapers rising behind red-tinted trees, with calm water reflecting the scene once more, is something only a city park offers. The catch is that in a photo, buildings and nature easily clash and feel cluttered, so deciding what goes in front and what gets blurred is important.
This article uses 6 photos, taken while walking for a little over an hour on the afternoon of November 18, 2025, together with the shooting settings (EXIF) of each, to go through how to capture autumn in a city park. It covers a wide waterway with buildings, the city beyond silvergrass, a traditional pavilion and its reflection, dried lotus leaves floating on the water, and backlight coming through fall leaves.
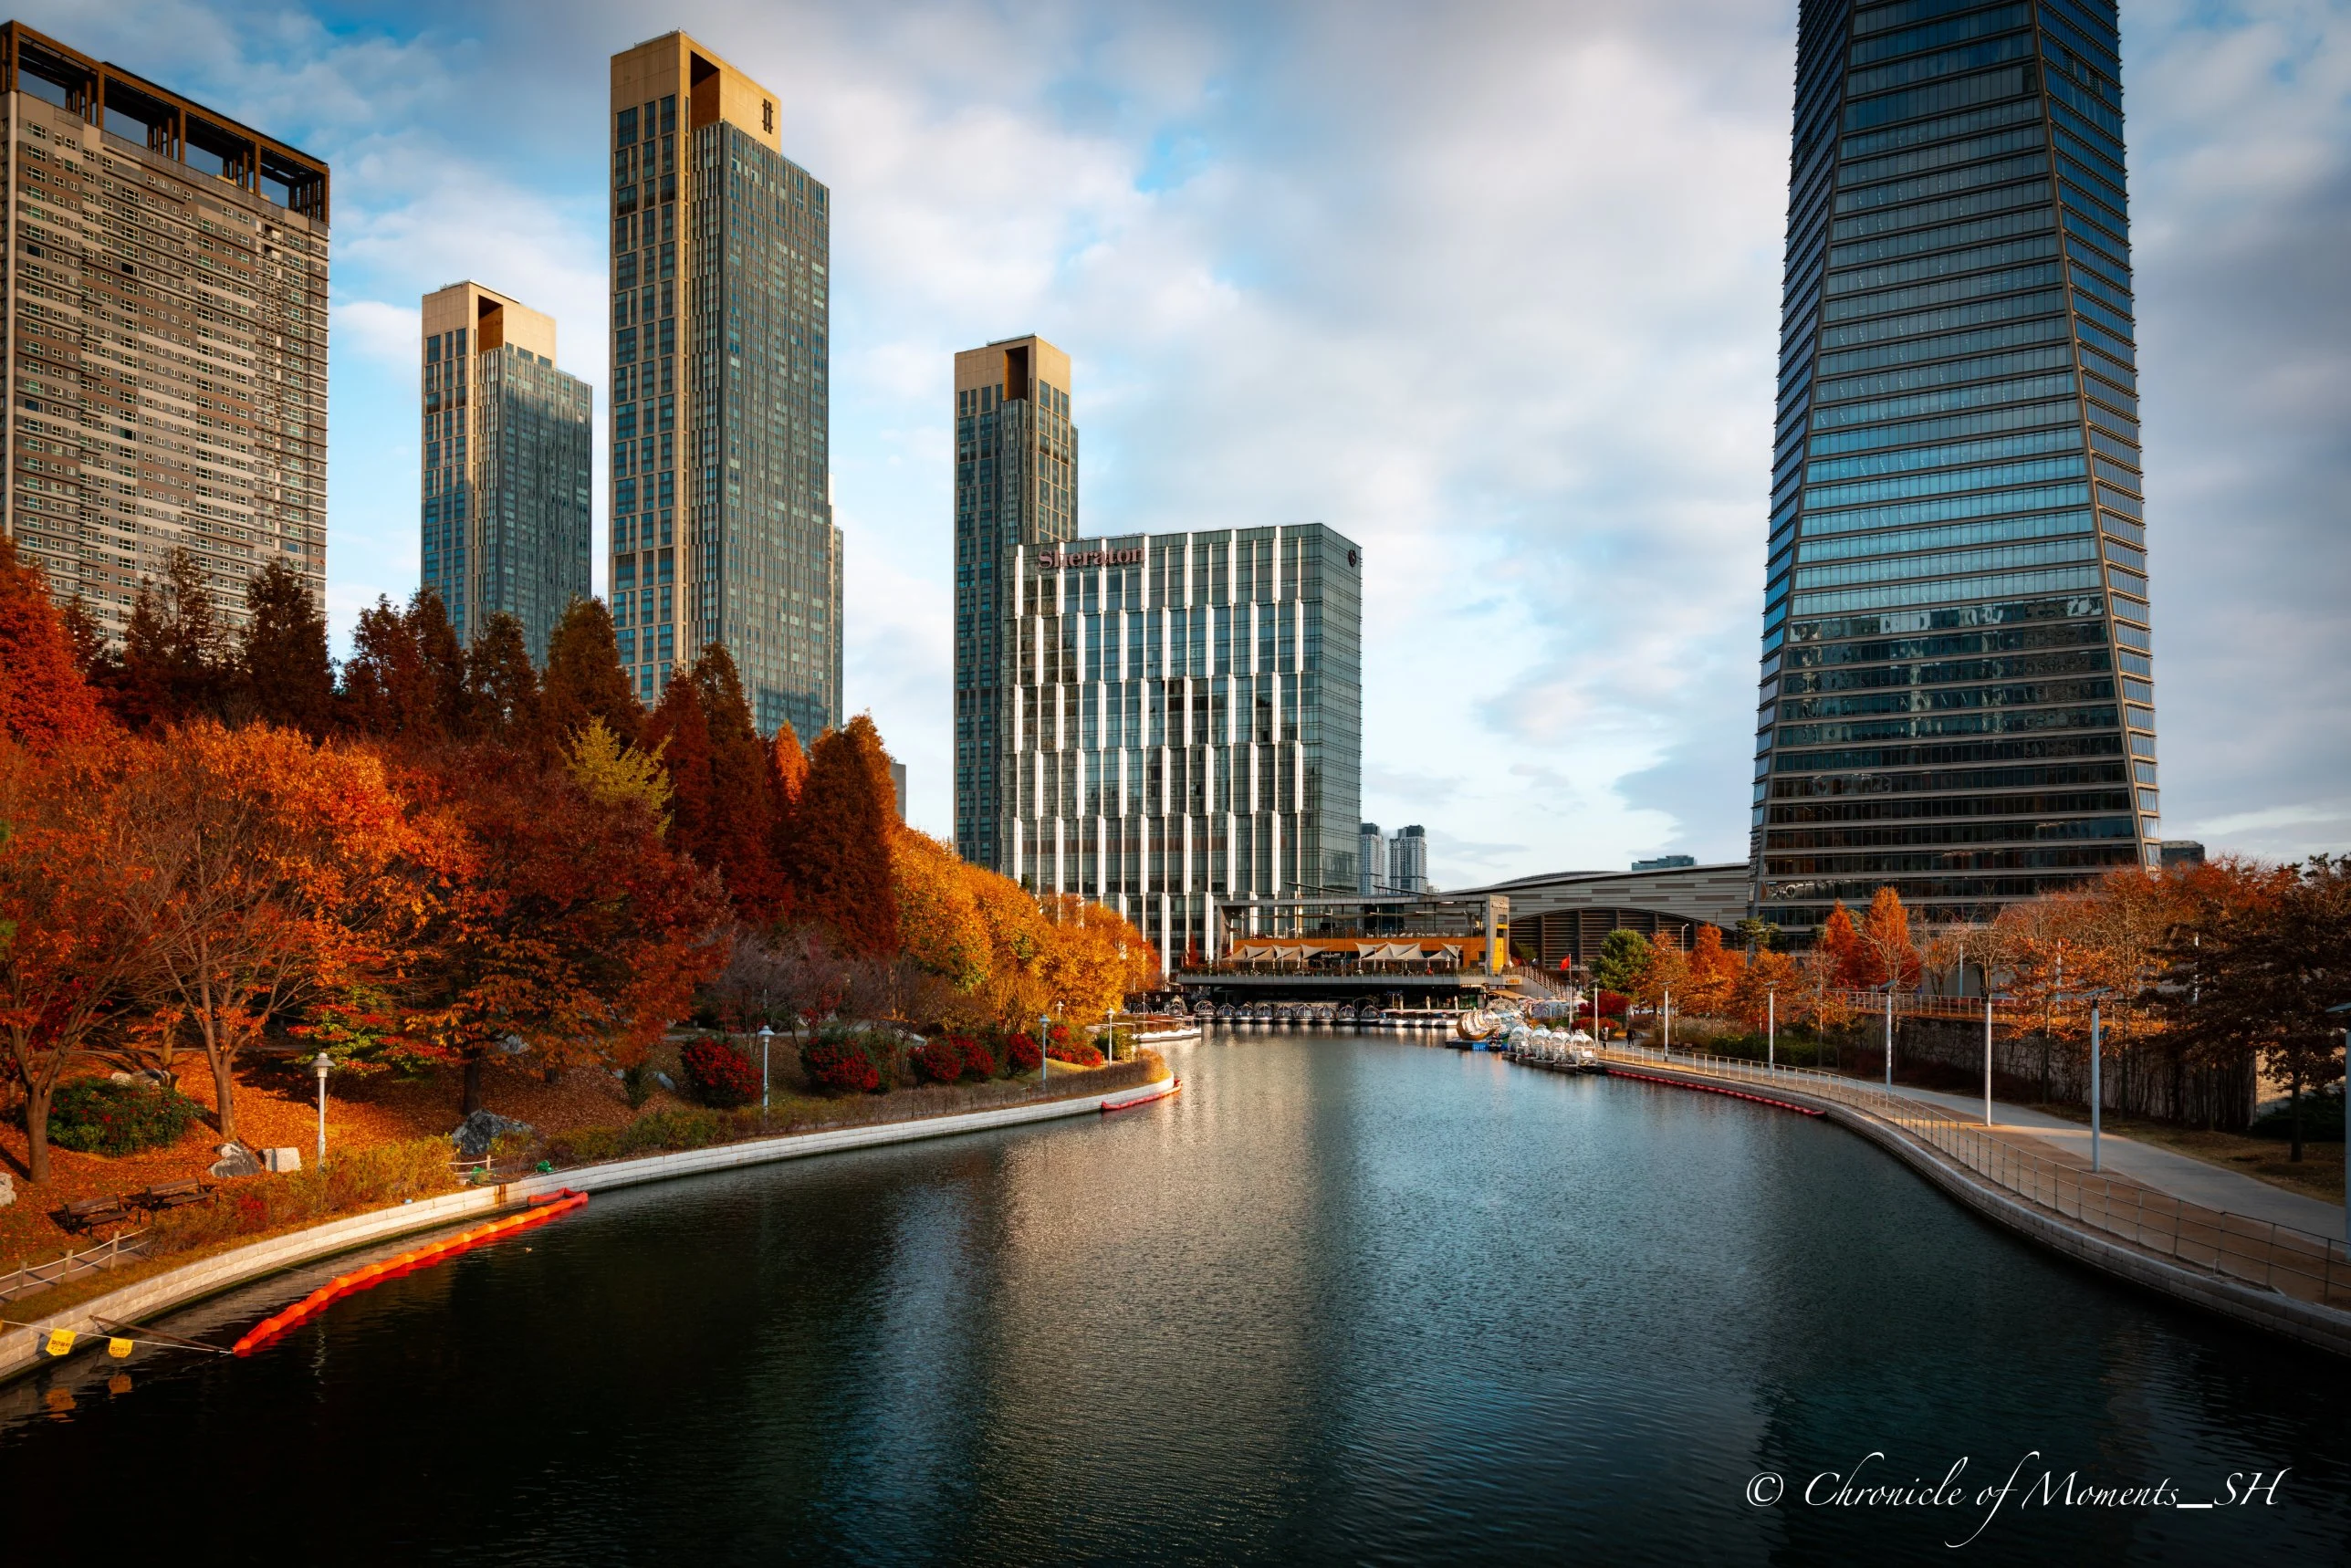
Canon EOS R5 Mark II · RF24-70mm F2.8 L IS USM · 24mm · F5.6 · ISO 50 · 1/40 s · 2025-11-18
(Click the photo to view it at full size)
Autumn in a City Park: What Can You Capture?
Autumn photos in a city park are made from three main ingredients: the lines and planes made by buildings, the color and texture of trees and grass, and the water that connects the two. The table below lists the 6 scenes in this article with their key ideas.
| Scene | Key idea | Example settings in this article |
|---|---|---|
| 1. Waterway with buildings and fall color | Lead the eye along the water, wide | 24mm · F5.6 · 1/40 s |
| 2. The city beyond silvergrass | Near silvergrass in front, city blurred | 50mm · F10 · 1/60 s |
| 3. Traditional pavilion by the water | Vertical frame with sky and reflection | 70mm · F4.5 · 1/60 s |
| 4. Building seen between trees | Frame with trees, reflection below | 56mm · F5 · 1/60 s |
| 5. Sky reflected in water and dried lotus leaves | Point the camera down, fill the frame with water | 24mm · F5 · 1/60 s |
| 6. Backlight through fall leaves | Stop down to make the sun a star | 70mm · F10 · 1/60 s |
What is interesting is that all 6 were taken with a single RF24-70mm F2.8 lens. A city park gathers subjects at many distances in one place, from wide views to distant buildings to nearby grass and leaves, so a single standard zoom covering 24mm to 70mm can handle most scenes. The camera was a full-frame R5 Mark II, so the marked focal length is the angle of view and no conversion is needed.
Buildings and Fall Color in One Frame: Pulling the Eye Along the Waterway
The photo at the top is the widest scene in this article. On the left, trees tinted red and yellow stand in a row, on the right tall buildings rise, and in the middle a waterway curves and continues inward. In a scene where buildings and trees share one frame, you need a line in the middle to guide the eye so the two elements do not compete, and in this photo the rounded edge of the water plays that role. Start from the bottom of the frame and follow the line as it curves gently inward, and you naturally arrive at the buildings. Using a continuing line in composition by the same principle is also covered in 5 Composition Checks Before You Press the Shutter.
The settings are 24mm, F5.6, ISO 50, and 1/40 s. Stopping a 24mm wide angle down to F5.6 keeps a fairly wide range sharp, from the water's edge in front to the buildings far away. Lowering ISO to 50 leaves almost no noise and keeps the tones of the dark water soft. In exchange the shutter speed is slow at 1/40 s, which is a speed where shake easily occurs even with a wide angle. If you shoot handheld, the safe approach is to turn on the camera's image stabilization, hold your breath, and shoot several frames to pick the least shaky one.
When you shoot a tall building with a wide angle, tilting the camera upward makes the building narrow toward the top. To avoid this, you can hold the camera level, include a lot of sky in the composition, and crop later, or, as in this photo, place the building at the edge of the frame so the lean is less noticeable.
Foreground in Front, City Soft: Silvergrass and Buildings Beyond the Lake
In a city park, the background easily gets cluttered with buildings and signs. In such cases, placing nearby grass or flowers large in front and blurring the background settles the busy background into soft blocks of color.
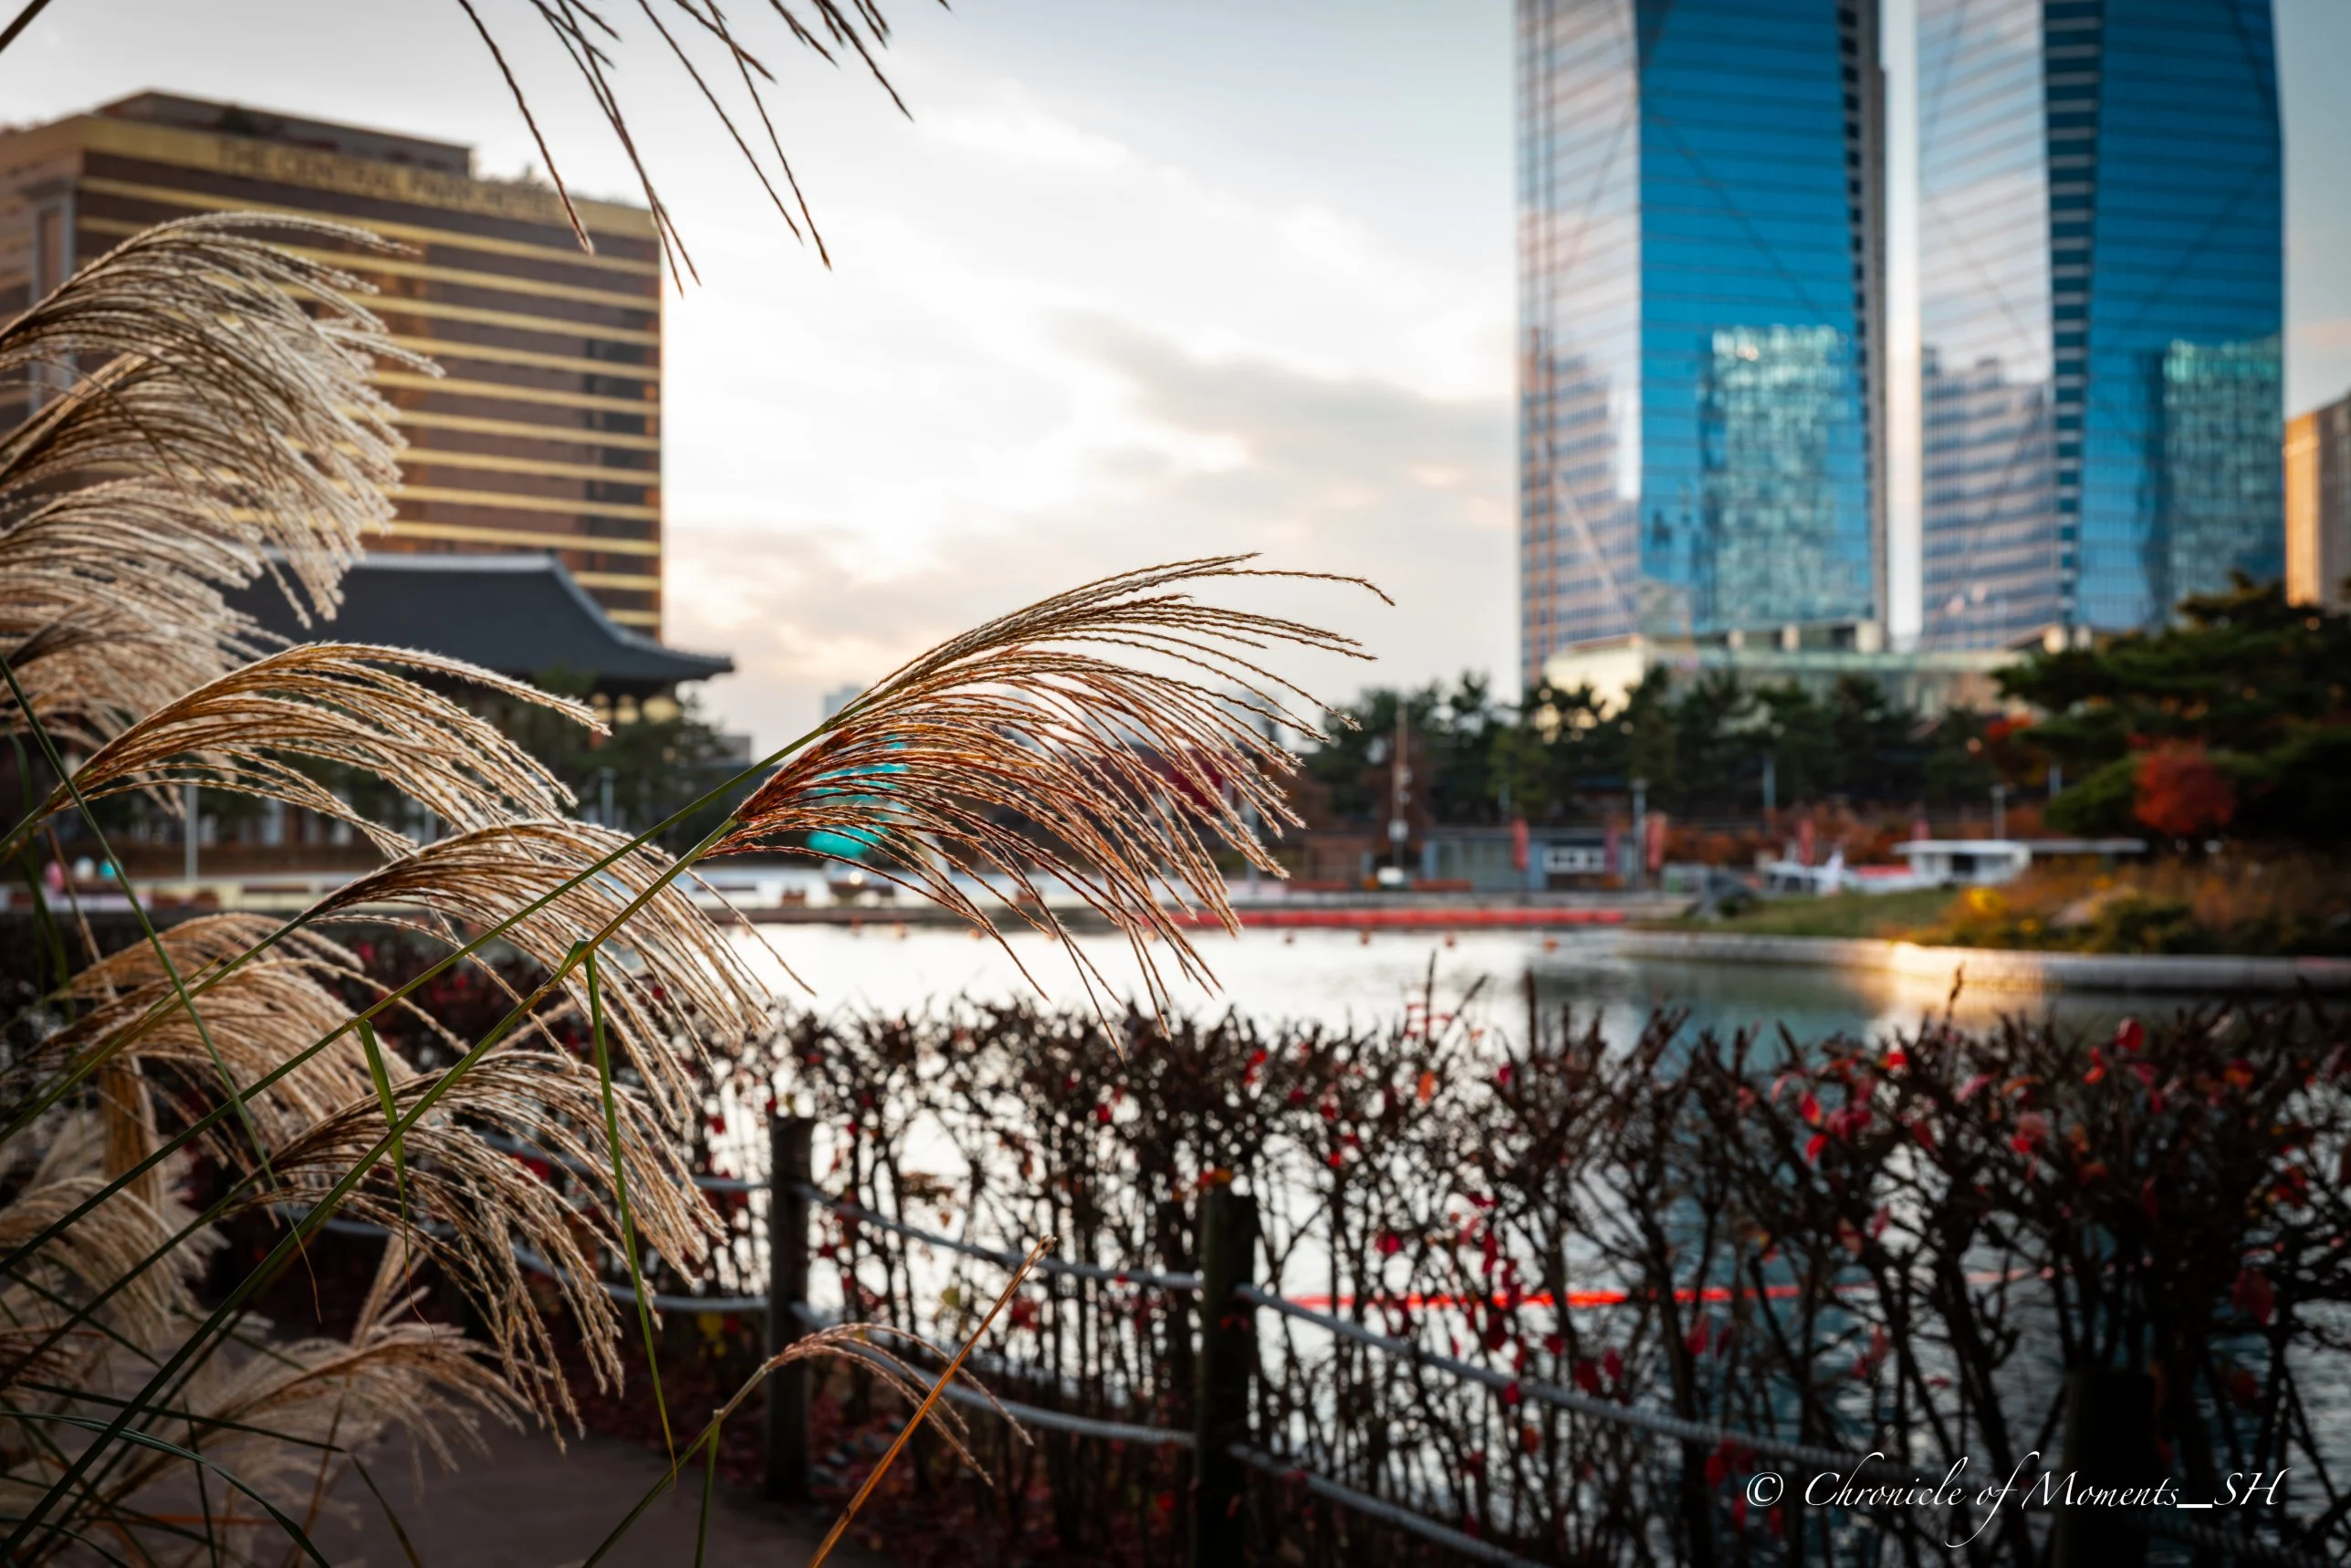
Canon EOS R5 Mark II · RF24-70mm F2.8 L IS USM · 50mm · F10 · ISO 320 · 1/60 s · 2025-11-18
(Click the photo to view it at full size)
This photo puts the silvergrass on the left of the frame closest and places the buildings and high-rises across the lake far away. The plumes are backlit with the sun behind them, so their edges glow and the outline of each fine strand comes alive. Stopped down to F10 at 50mm, the depth of field is not shallow, but the silvergrass is close to the lens and the buildings are much farther away, so the background still blurs enough. This is because the range in focus is decided not only by the aperture value but by the distance to the subject and the focal length together. If you want to check this relationship with numbers, use the guide to understanding depth of field and the depth of field calculator.
For exposure it is ISO 320 and 1/60 s. In the afternoon with the sun lower, the backlit silvergrass is bright and the building side easily goes dark, so the safe approach is to lower exposure slightly so the bright parts of the silvergrass do not blow out and then lift the dark parts in editing. In backlight, light can hit the front of the lens directly and reduce contrast, so using a lens hood or blocking the light with your hand is also an option.
Shooting Vertical: A Traditional Pavilion and a Building Between Trees
City parks do not have only modern buildings; many also have pavilions or hanok-style buildings in a traditional style. Traditional architecture has rich texture from its curved roofs and wooden structure, and contrasts with the glass buildings behind it, giving a feeling of different eras overlapping. The two photos below use a vertical frame to take advantage of the space above and below.
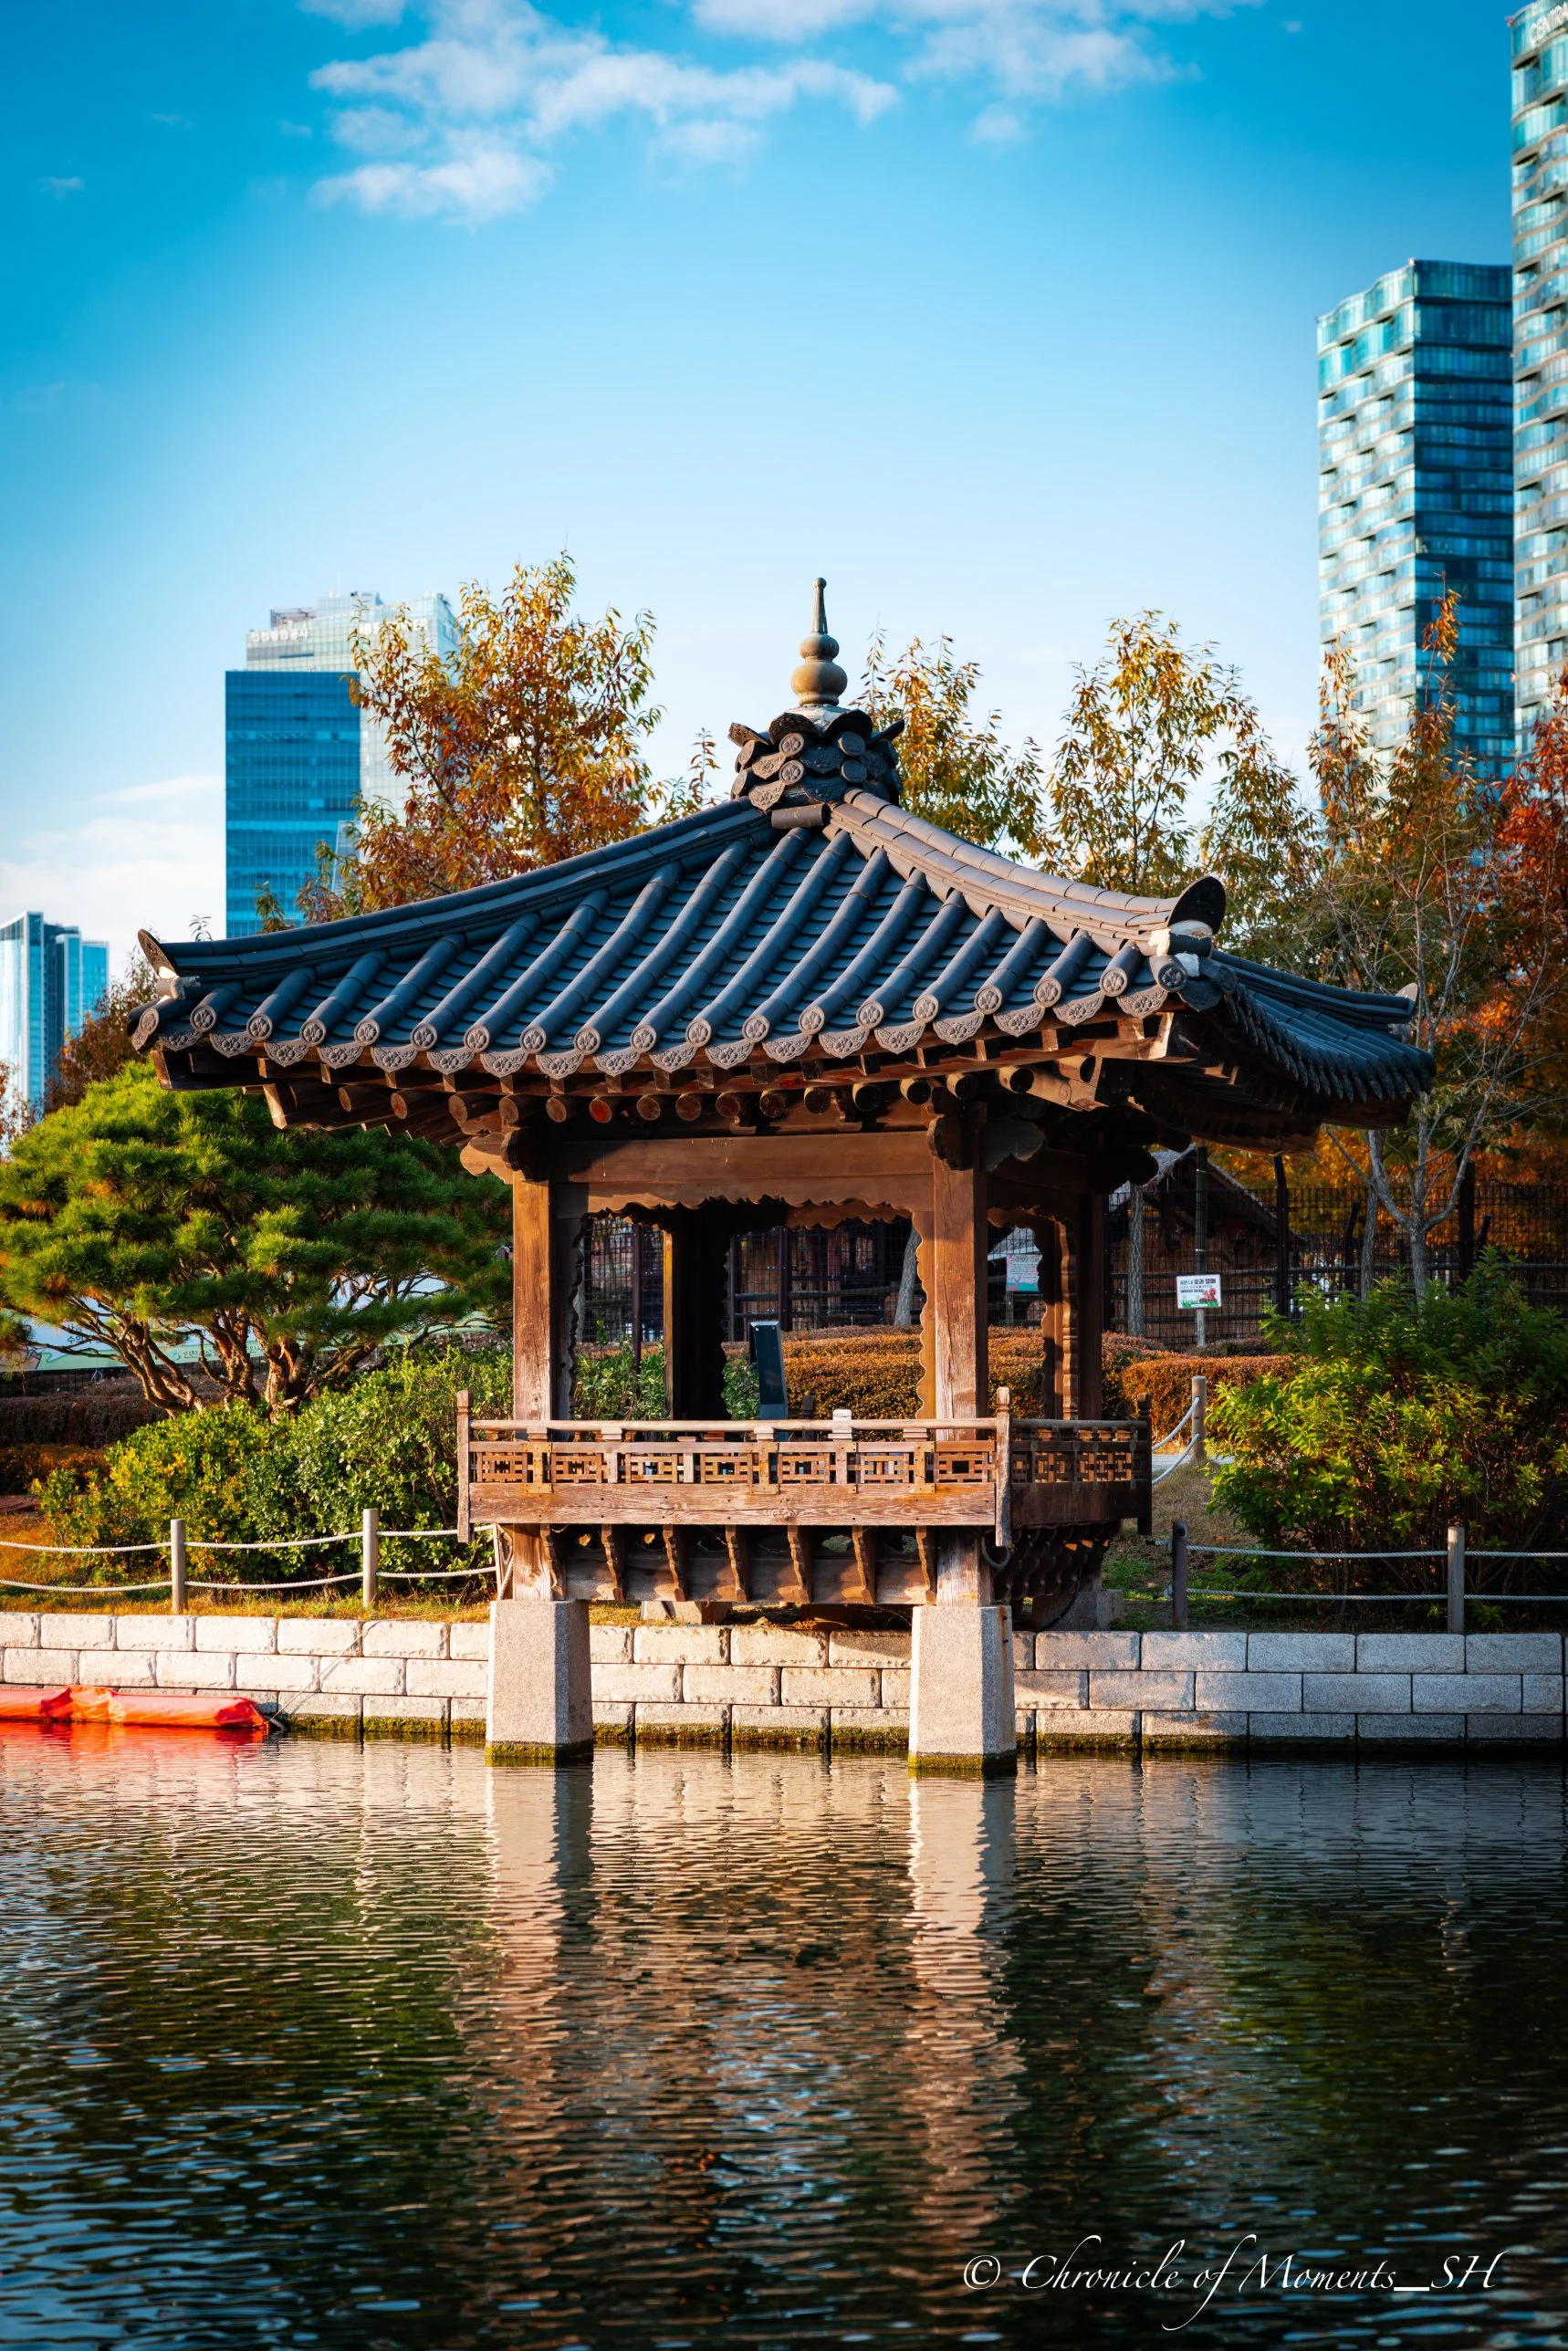
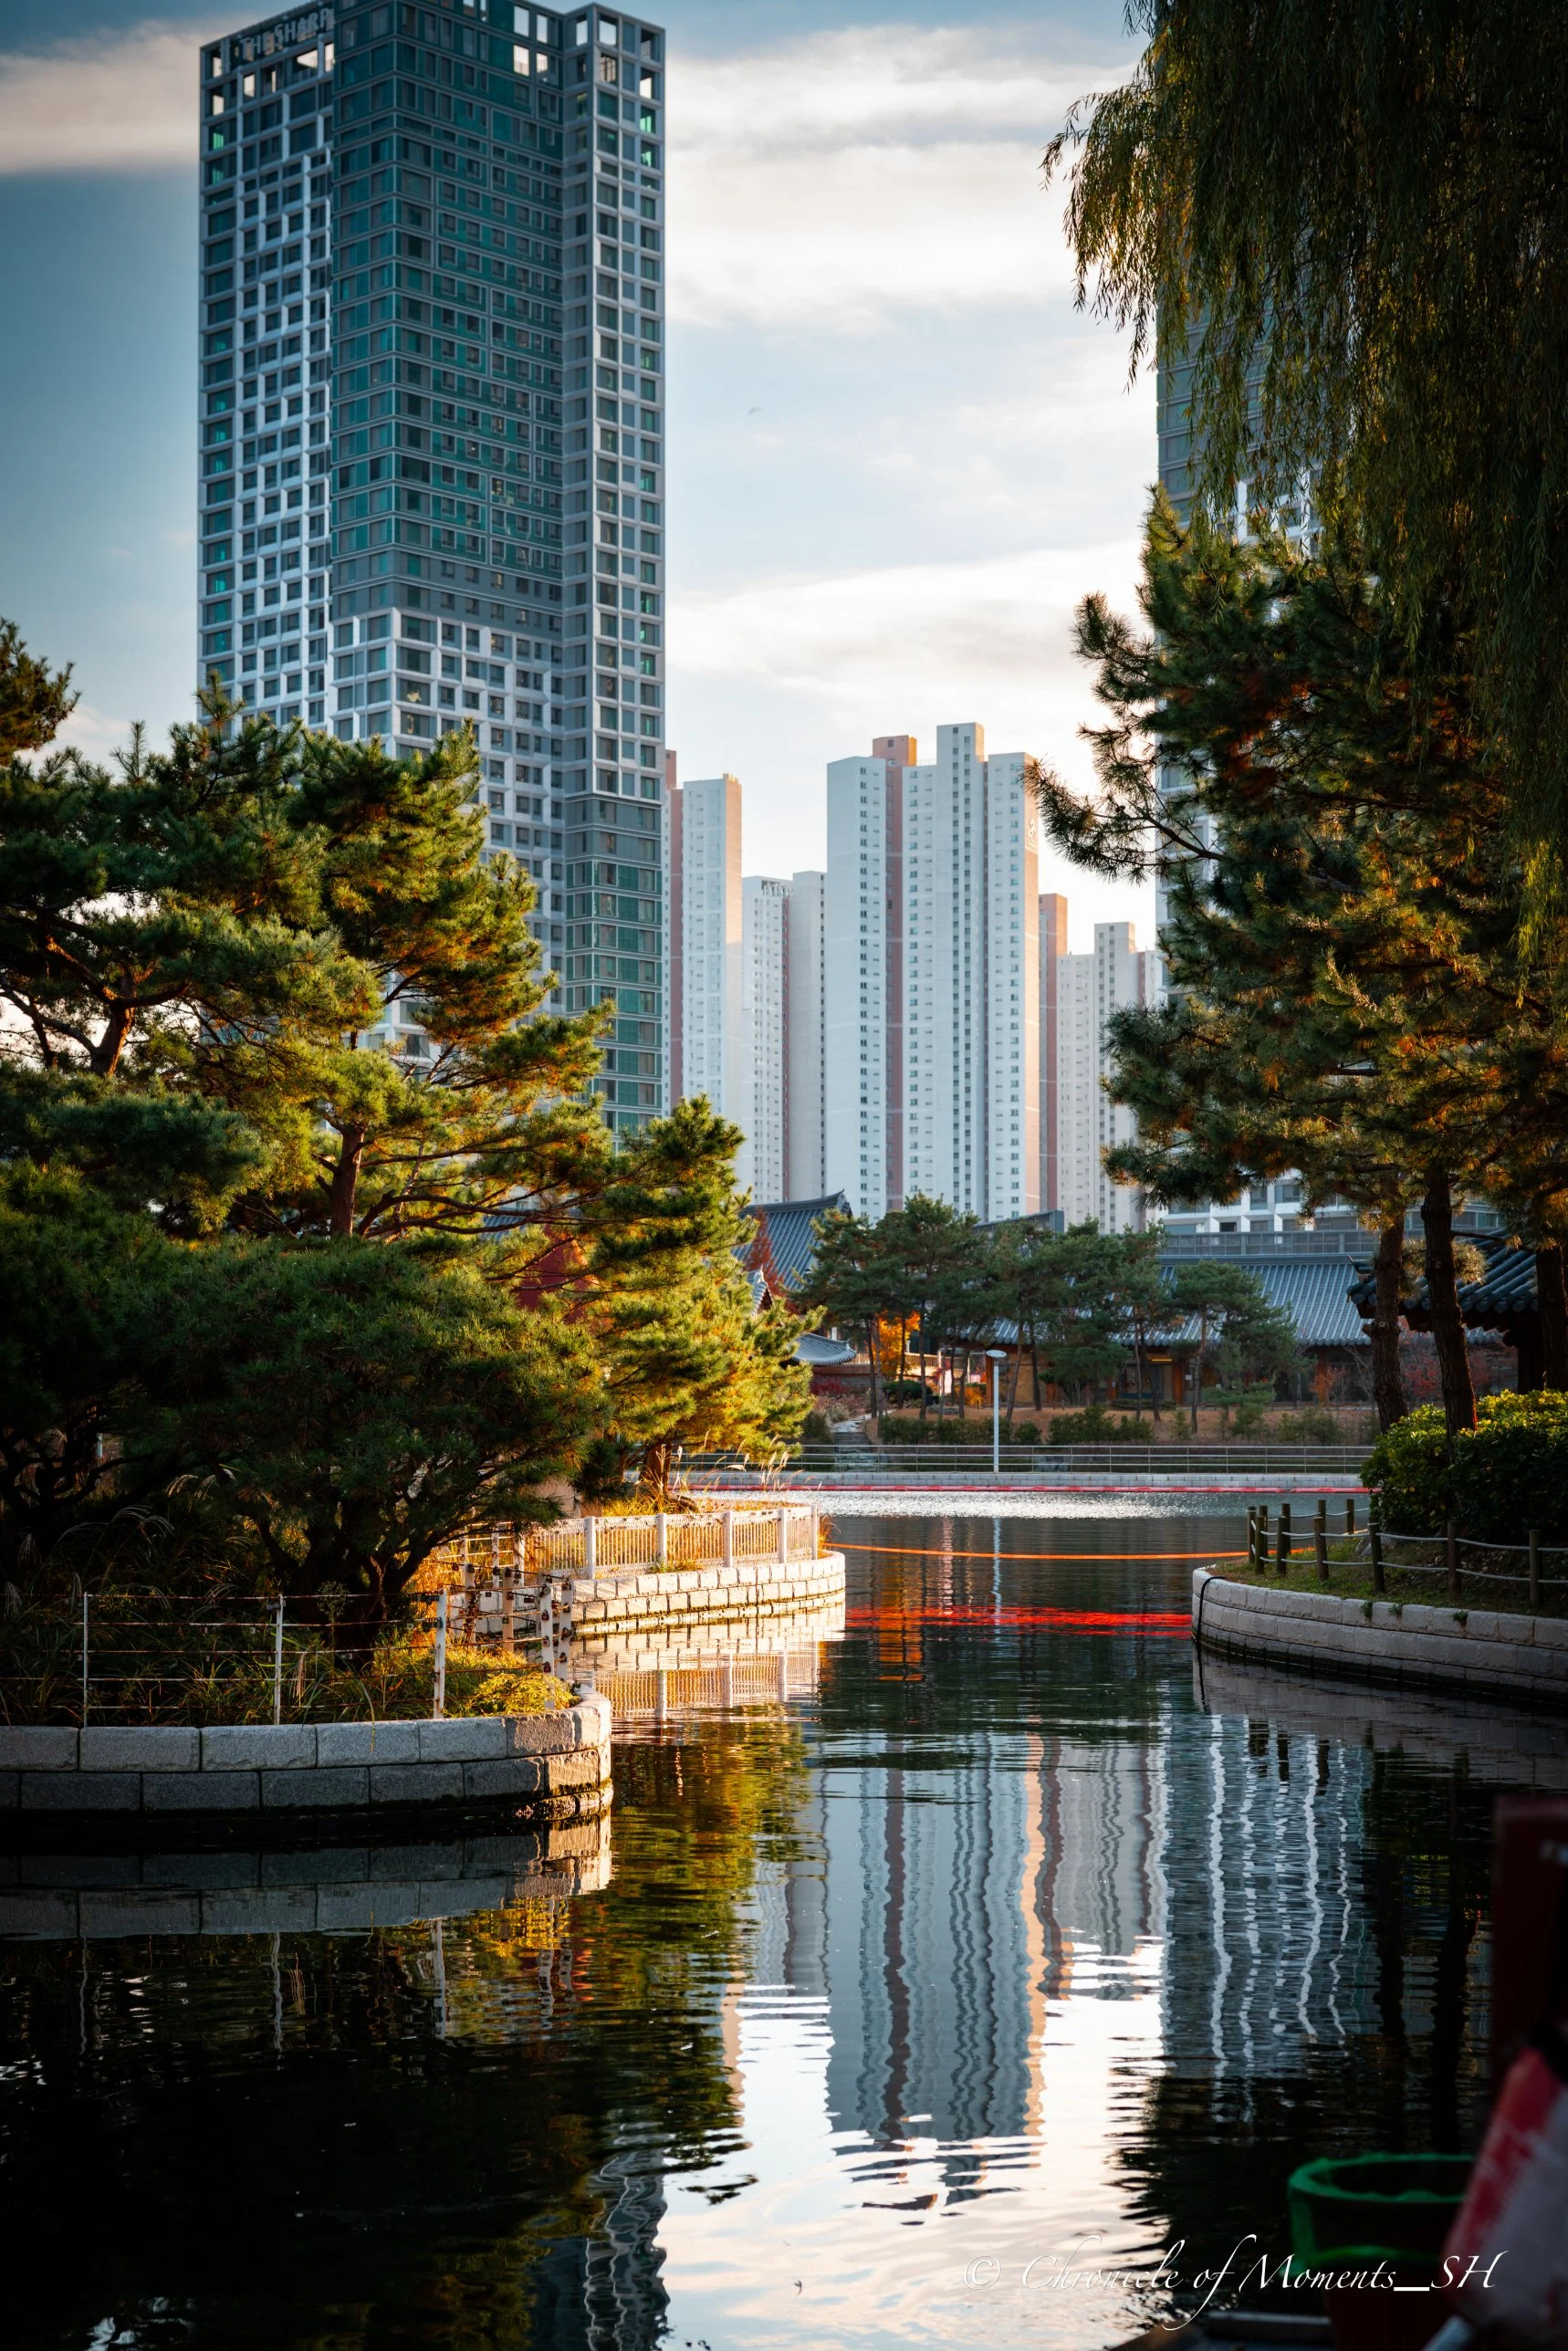
(Click a photo to view it at full size)
The photo on the left places the pavilion in the middle of the frame, with blue sky above and the pavilion's reflection in the water below. At 70mm telephoto I opened to F4.5 to soften the trees and buildings behind the pavilion moderately. The vertical frame keeps the height of the roof and the space of the sky intact, and the ripples below stretch the reflection of the pavilion's pillars long, creating a stability close to top-bottom symmetry. The point of this photo is that I zoomed to 70mm so the pavilion itself appears large in the frame. A telephoto compresses the background so the building behind looks close to the pavilion, strengthening the feeling of traditional and modern buildings overlapping in one scene.
In the photo on the right, pine and drooping willow branches act as a frame on both sides, and a tall building rises between them. This way of capturing a building between trees keeps it from looking flat as it would if shot alone, and gathers the eye toward the center. Shot at 56mm and F5.0, both the trees in front and the distant building come out fairly sharp, and on the water surface below, the building's reflection stretches long like stripes. The warm light touching the edges of the trees as the sun is low also builds the mood of this scene.
If you are unsure whether vertical or horizontal suits a scene, see Horizontal vs. Vertical Composition: How to Choose Photo Orientation for the Scene. Scenes that combine height and reflection are usually better in vertical.
The City Reflected in Water: How to Shoot Reflections Well
In 3 of the 6 photos in this article, the water surface plays an important role. Water reflects the sky, buildings, and trees once more, making the same scene twice as rich. There are three main tips for capturing reflections well.
First, choose a time when the water is calm. With weak wind and a surface that barely moves, you get a mirror-clear reflection, and if there are ripples, the reflection stretches into stripes as in the photo on the right, creating another graphic effect. Second, lower the camera height. The closer to the water surface, the larger the share of the frame the reflection takes up. Third, set exposure for the brightness of what is reflected. The water surface can come out surprisingly dark depending on the brightness of the sky or buildings it reflects, so it is good to check on the screen that the part reflecting bright sky has not blown out to white.
Dried Lotus Leaves and Backlight Through Fall Leaves: Two Small Scenes
The mood of autumn is in small scenes as well as wide landscapes. Both photos below use a horizontal frame to capture the texture of the water surface and the light coming through leaves.
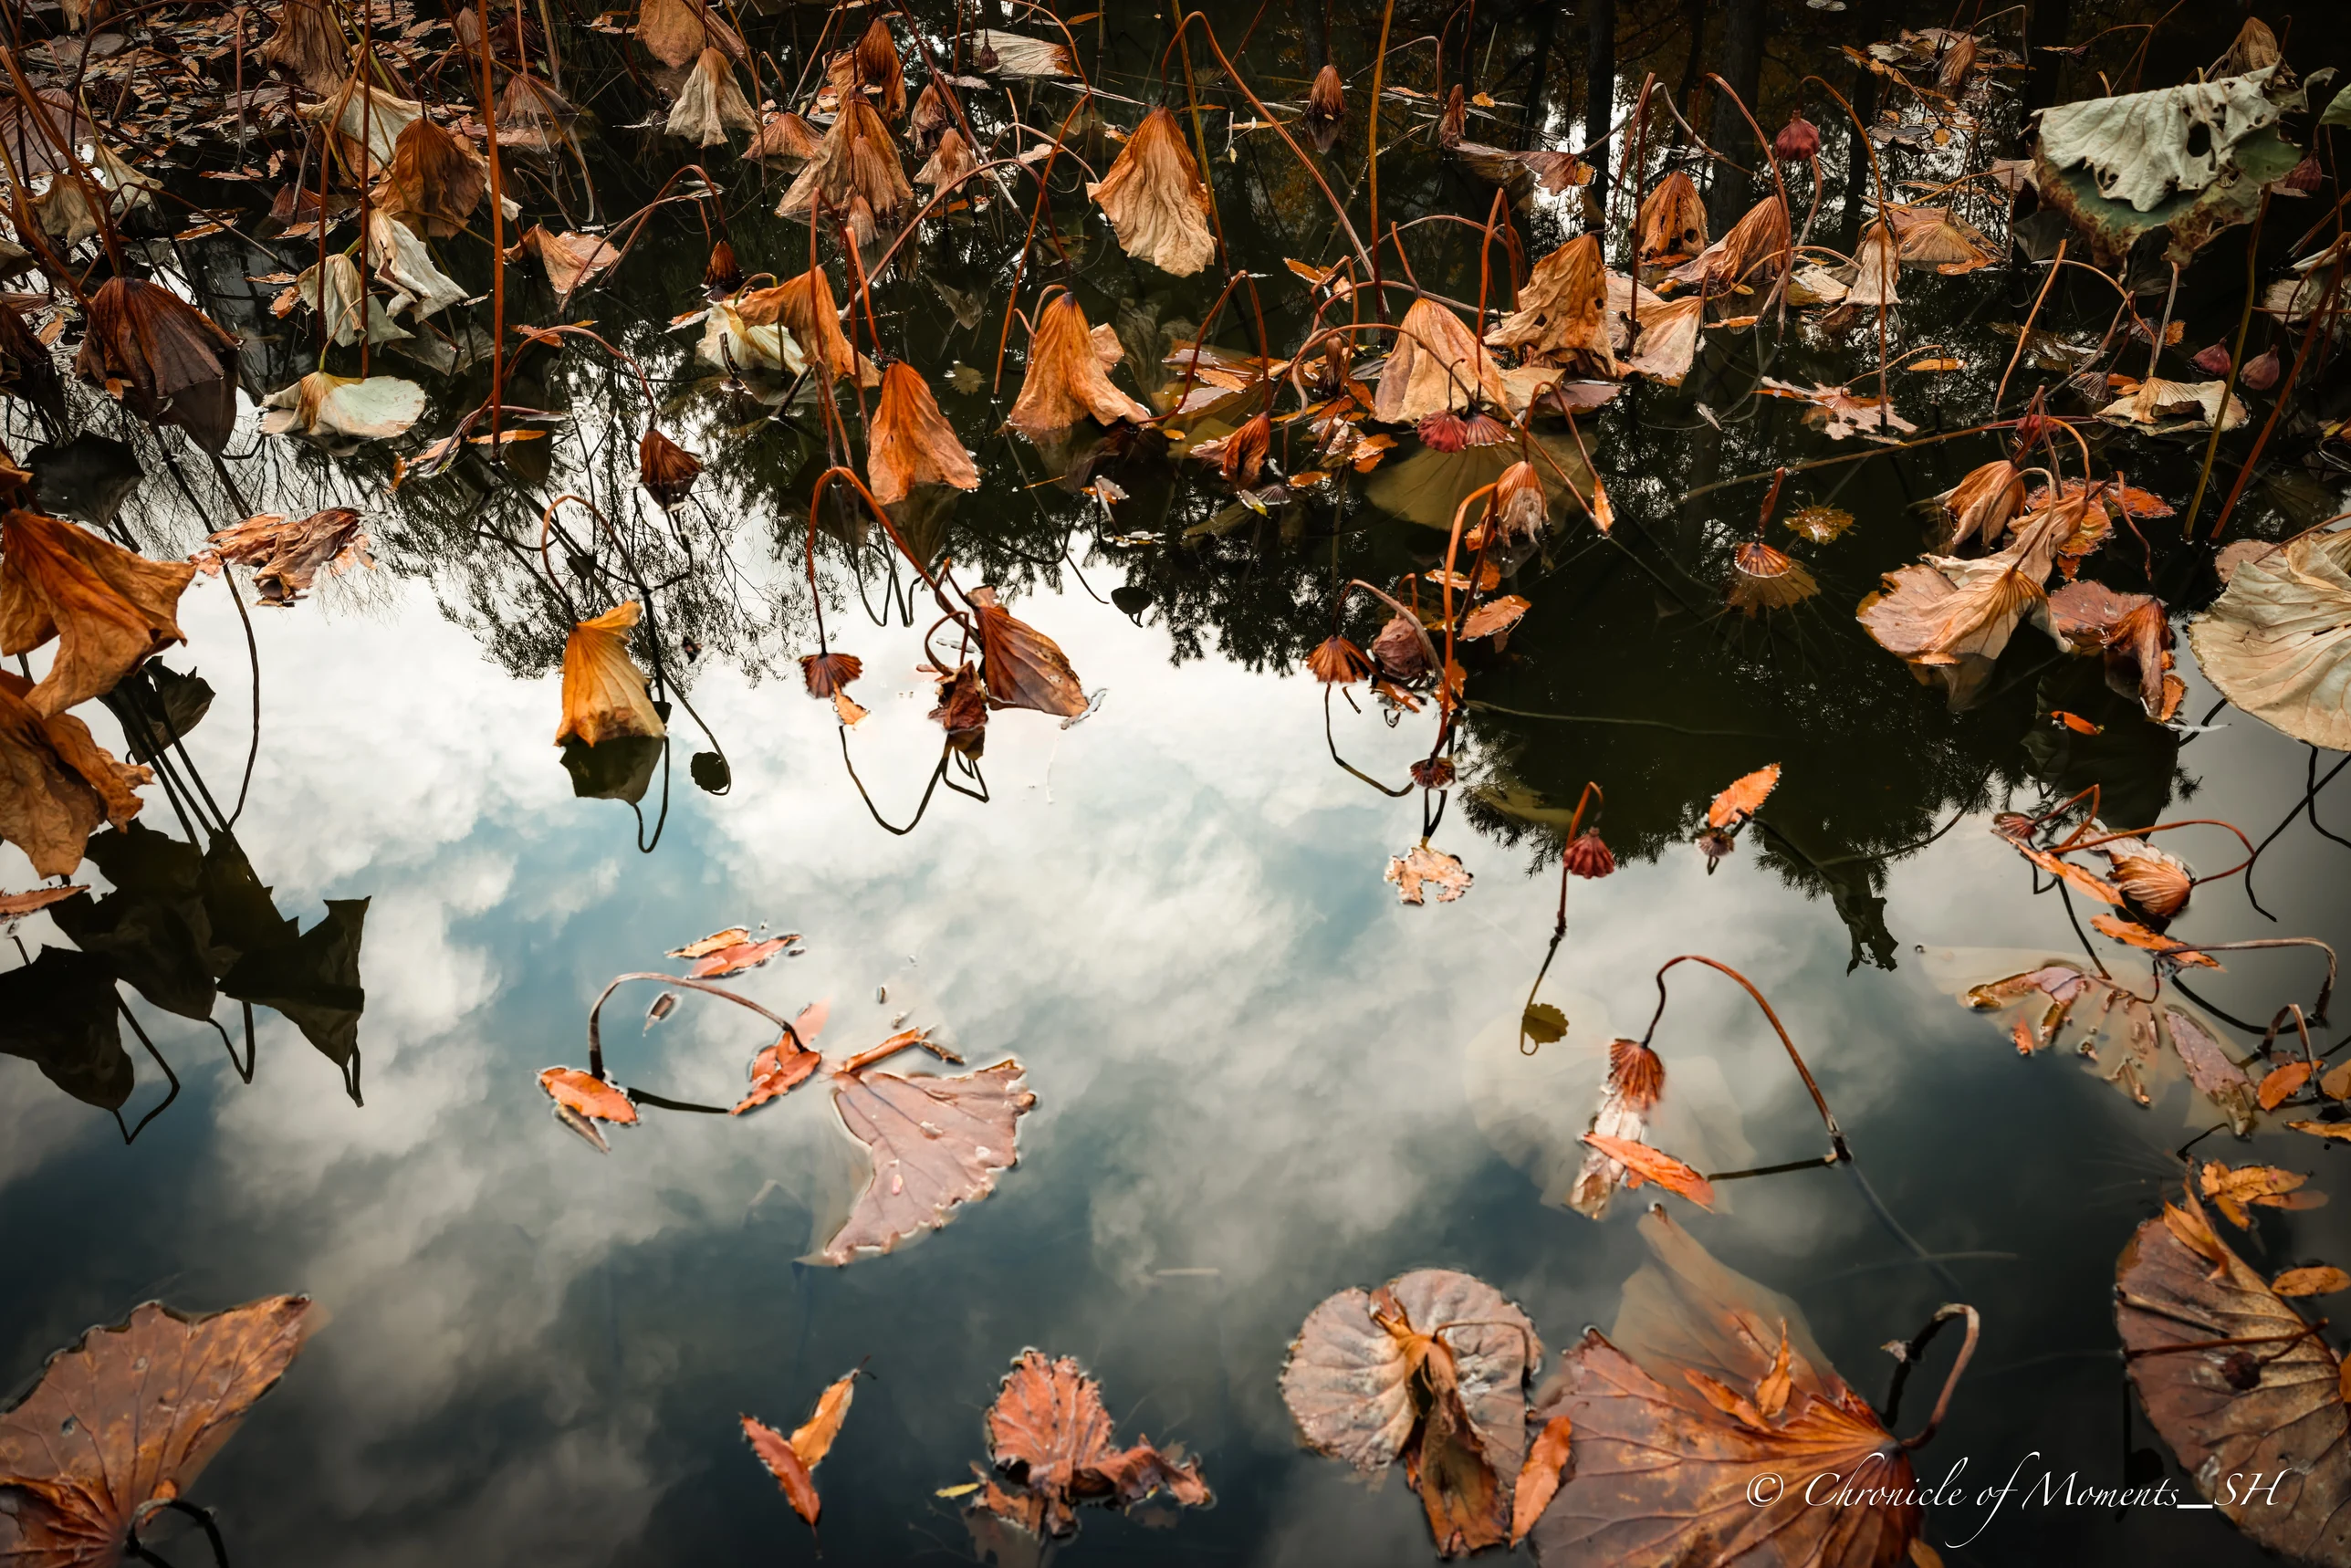

(Click a photo to view it at full size)
The photo on the left points the camera down and fills the frame with the water surface. Clouds and trees are reflected in the water, and withered lotus leaves and stems sit on top, creating a contrast of dark at the top and bright at the bottom. The orange of the lotus leaves and the blue of the sky in the water are close to complementary, so the colors are vivid too. I moved close with the 24mm wide angle to capture the shape of the leaves large, and used F5.0 and 1/60 s so both the leaves and the reflection on the water are visible. A photo like this can even be composed so you cannot tell which way is up, so placing the part of the water that reflects the sky at the center of the frame is the composition point of this photo.
The photo on the right looks up from beneath a maple tree. Deep green, red, and yellow leaves fill the frame, and the sun spreads in a star shape between the leaves. Stopping down to F10 at 70mm makes the light from the sun easily appear as a pointed star, and I raised ISO to 400 to secure a shutter speed of 1/60 s. In compositions where the sun is directly visible, the bright sky easily makes the exposure dark, so when you capture dark leaves and bright sky together as in this photo, it is good to check with exposure compensation that the colors of the leaves are alive. The principle of stopping down to make light a star is covered in more detail in How to Set Your Camera for Light Starbursts in Night Photography.
Walking With the Afternoon Light: When the 6 Photos Were Taken
Looking at the shooting times in order shows how the light changed that day.
| Time taken | Scene | Focal length | Aperture | ISO |
|---|---|---|---|---|
| 14:15 | Dried lotus leaves and water | 24mm | F5.0 | 125 |
| 14:57 | Backlight through fall leaves | 70mm | F10 | 400 |
| 15:57 | Waterway with buildings and fall color | 24mm | F5.6 | 50 |
| 16:09 | The city beyond silvergrass | 50mm | F10 | 320 |
| 16:10 | Traditional pavilion by the water | 70mm | F4.5 | 125 |
| 16:14 | Building between trees and reflection | 56mm | F5.0 | 125 |
In the late-autumn afternoon the sun drops quickly, so the color and direction of the light change even within an hour. After 4 p.m., warm light touches the edges of the trees and buildings and the colors of the photos become richer. Checking the shooting settings for the hours when the sun is setting and how the light changes through the day with the sunrise and sunset photography guide and the golden hour calculator helps you plan on location.
City Park Autumn Shooting Settings at a Glance
| Photo | Focal length | Aperture | Shutter speed | ISO | Key point |
|---|---|---|---|---|---|
| 1. Waterway and buildings | 24mm | F5.6 | 1/40 s | 50 | Water's curve leads the eye |
| 2. Silvergrass and city | 50mm | F10 | 1/60 s | 320 | Near foreground, blurred background |
| 3. Traditional pavilion | 70mm | F4.5 | 1/60 s | 125 | Vertical composition, sky and reflection |
| 4. Building between trees | 56mm | F5.0 | 1/60 s | 125 | Frame with branches |
| 5. Lotus leaves and water | 24mm | F5.0 | 1/60 s | 125 | Water reflecting the sky |
| 6. Backlit fall leaves | 70mm | F10 | 1/60 s | 400 | Star-shaped light, exposure compensation |
Checklist
- Which is the main subject, buildings or nature, and did you tidy the rest into the background?
- Is there a line (water's edge, path, railing) in the frame to lead the eye?
- Can you use a nearby foreground to blur a busy background?
- Did you look for the height and angle at which the reflection on the water is seen best?
- When shooting a tall building with a wide angle, did you avoid tilting the camera upward?
- In a backlit scene, has the bright sky not blown out to white?
Common Mistakes: Trying to Fit Both Buildings and Nature
The most common mistake in a city park is trying to fit every building, tree, body of water, and patch of sky you see into one frame. Signs, wires, and people that your eyes naturally filter out all show up together in a photo and give a cluttered impression. It is much cleaner to decide on one thing to show and either cut the rest out of the frame or blur it behind a foreground.
Another is lifting the camera upward when shooting a building with a wide angle so the building leans. When the vertical lines of a building converge enough to be distracting, the photo looks unstable, so check that the camera is level and, if needed, include plenty of sky and crop later. Finally, when shooting reflections on water, many people do not check the exposure of the reflected part and the sky blows out to white. A habit of checking the bright areas on the monitor once is a good one.
FAQ
What lens is good for autumn photos in a city park?
A single standard zoom lens such as a 24-70mm can capture most scenes. Use around 24mm for wide views, and around 70mm when pulling in distant buildings or a pavilion; all 6 photos in this article were taken with this one lens.
What time is best for reflection photos?
The best time is when the wind is weak and the water is calm. If light reaches the sky and buildings evenly, the reflection also comes out clear, and in the afternoon with the sun low, warm light touches the scene and the colors are richer.
How do I make the sun a star shape in backlight?
Stopping the aperture down to around F8 to F16 makes the sun appear as a pointed star. The fall leaf photo in this article was shot at F10, and you can use exposure compensation along with it, checking that the bright sky does not make the exposure too dark.
How do I keep buildings from looking tilted?
Hold the camera level and place the building at the edge of the frame so the lean is less noticeable. Capturing plenty of space above and cropping in editing is also effective.
Putting It Together
Autumn in a city park gathers buildings, nature, and water in one place, so you can make a wide variety of photos with a single lens. For these 6 photos, I led the eye with the curve of the water's edge, tidied the background with nearby silvergrass, framed with a pavilion and trees, and also used the reflection on the water and the backlight through fall leaves. The most important principle is to decide first what the main subject is, and blur the rest or leave it out of the frame. You can continue with how to check light and composition together in the light, timing, and composition guide, and also see 6 Autumn Scenes to Photograph, With Camera Settings and Composition, which captures the same autumn with different subjects.
Copyright Notice
All photos used in this post are works taken directly by the site operator (Chronicle of Moments_SH). Photographs are protected as photographic works under Article 4(1)(ix) of the Korean Copyright Act, and copyright arises from the moment of shooting without any registration or other procedure (Article 10(2)).
Without the copyright holder's prior permission, it is prohibited to reproduce the photos in this post (Article 16), to post or transmit them on blogs, forums, social media, or communities (public transmission, Article 18), or to modify or edit them into derivative works (Article 22). Removing or altering the copyright notice and frame in a photo can also infringe the right of attribution (Article 12) and the right to integrity (Article 13). Uses the law permits, such as fair quotation of a published work (Article 28) or use within a private or domestic scope (Article 30), are exceptions.
Unauthorized use can lead to injunction claims (Article 123) and damages claims (Article 125), and can be punished by imprisonment of up to 5 years or a fine of up to 50 million won (Article 136(1)). For-profit or habitual infringement can be punished even without a complaint (Article 140).
Photo-use inquiries: skysmoga@gmail.com
© Chronicle of Moments_SH. All rights reserved.